Chocolate

A new Page!

I’ve added a special page to my blog about Chocolate!  I decided to do this as a “page” rather than a blogpost so that it would not get lost in the mix.  Below my blog heading you will see a link to Chocolate, and I encourage you all to take 3 minutes of your time to read about this very important matter.

Happy Baking!

Posted in Uncategorized | Leave a comment

Butterfinger Banana Cake with Peanut Butter Cream Cheese Frosting

Do you have somebody who you have wronged and you don’t know how to make it right again?  Has your childhood friend never forgiven you for comparing her hair to a poodle?  (Mine has, and she remains a dear friend to this day.)  Did you forget to call your father on his birthday?  (For the record, I didn’t FORGET, I was out late.)  Has your college roommate never forgiven you for stealing her boyfriend?  (Ok that didn’t happen in my world, but I thought it sounded good.)

This cake can be used to beg for forgiveness.  This cake could lure in that person you have your eyes on but doesn’t know you exist.

This cake should be set upon altars as a gift to God.

This cake should be brought to international diplomatic meetings as a first step in restoring America’s reputation.

Yes, the cake is THAT good.

People in my office who previously could not be bothered to say hello to me even if we were the only two people on the elevator sought me out to sing the praises of this cake.

Once you make this cake, the only reason you will stop eating it will be because your teeth will start to rot away from the sweetness.  It’s still so good that you will want to then puree it so that you can keep eating it without your teeth.

(If you have an informal event, this would work great as cupcakes as well. )

P.S. Don’t forget my Tips & Tricks!

Without further ado….

Butterfinger Banana Cake with Peanut Butter Cream Cheese Frosting
adapted from: Dozen Flours

Simple Syrup (optional)
1/2 c sugar
1/2 c water

Cake
5 (2 1/8 ounce) Butterfinger candy bars
1/2 c unsalted butter, room temperature
1 3/4 c granulated sugar
3 eggs, room temperature
4 very ripe bananas, mashed
1 t vanilla
2 1/2 c flour (I prefer cake flour, All-purpose would work too)
1 t baking soda
1/8 t salt
2/3 c buttermilk, room temperature

Frosting
12 oz cream cheese, room temperature
1/4 c unsalted butter, room temperature
1/4 t kosher salt
1 t vanilla
6 c powdered sugar
1/2 c creamy peanut butter (avoid the all-natural kind)

Simple Syrup  (optional)

  • In a small saucepan over medium-high heat, combine the sugar and water together. Stir until the sugar dissolves. Bring to a full boil for about 3 minutes. Turn off the heat and move the pot away from the burner to cool for at least an hour. Cover and store in the fridge.

Cake

  • Preheat oven to 350F. Grease and flour two 9″ cake pans. In the food processor, coarsely chop the candy bars; set aside.
  • In a large mixing bowl, cream the butter and sugar with an electric mixer until light and fluffy. Beat in the eggs one at a time, scraping down the sides of the bowl after each addition. Mix in the mashed bananas and vanilla extract.
  • In a separate bowl, sift together the flour, baking soda, and salt.  Add the dry ingredients and the buttermilk alternately to the egg mixture (in two to three additions each) and incorporate thoroughly.
  • Reserve 1/2 cup of the chopped Butterfinger candy bars and fold the rest into the batter. Divide the batter between the cake pans and bake for 30 minutes, or until a toothpick inserted in the center comes out clean. Cool the cakes on wire racks for 10 minutes. Invert onto a rack and cool completely before frosting.

Frosting

  • In a large mixing bowl, blend the cream cheese, butter, and vanilla with an electric mixer until smooth. Add the powdered sugar and peanut butter and mix until smooth.

Assembly

  • Inspect the cakes and cut the tops to even them out, if necessary.  Using a pastry brush, generously “paint” the surface and sides of each cake with the simple syrup. Don’t be afraid to really get the cake wet.
  • Spread a “crumb coat” of frosting on the tops and sides of each cake, and place it back in the fridge to firm up for about 15 to 20 minutes.
  • Add the middle layer of frosting between the two cakes and stack them.  Spread the remaining frosting over top and sides of the cake.
  • Sprinkle the reserved crushed Butterfingers over the top of the cake.  Store in the fridge, covered until you’re ready to serve.

Butterfinger-Banana-web

Posted in Baking Jumbles | Tagged , , , , , | 2 Comments

Tips and Tricks

I’m not a pro in any of this baking stuff, but there are a few tricks of the trade I’ve picked up along the way that help me create better treats. I have mentioned, and will continue to mention, these in my recipes without going into detail. So, this page can be used as a reference. I apply these techniques to almost everything I make, whether the recipe instructs me to do so or not.

Sift – you know how some recipes tell you to combine your dry ingredients (flour, baking soda, baking powder, salt, etc.) and then mix them in to the wet stuff? Even if the original recipe doesn’t tell you to do so, I recommend you sift this stuff. If you don’t have a sifter, passing it through a sieve or whipping it with a whisk is better than nothing. This aerates the dry ingredients, making it fluffy and your cookies or cake will be light and fluffy too!

Cake Flour – Cake flour is made from the endosperm of wheat, which is the softest part. On top of that, it’s bleached and milled more than All Purpose (AP) flour, so it has less protein (gluten, which is a binding agent) and is high in starch. The lightness of this flour gives cakes and cookies a better rise than AP flour. If a recipe calls for cake flour and you don’t have any, you can make your own quite easily: put 2 tablespoons of cornstarch into a 1 cup measuring cup, spoon enough AP flour to fill cup, and sift together at least 3 times. Now, in reverse, I almost always use cake flour even when a recipe calls AP flour. This is, of course, at my own risk. But knowing that AP flour is so much “stronger” than cake flour (since it has more protein), use your judgment to decide when you can substitute and when you may not want to. Supposedly you need to use an additional 2 tablespoons of cake flour when doing this, but I’ve done it 1:1 and have had fine results. I don’t want to be responsible for your catastrophes if you substitute flours, but I can tell you that in my experience, so far so good. More info on flour.

Simple Sugar Syrup – want to add some moisture to your cake and lock it in? Prepare a batch of simple sugar syrup and generously paint it on the cake after it has cooled. Immediately after doing so, move on to the crumb coat (see below) to lock in the moisture. Simple Sugar Syrup is equal parts water and sugar, boiled for about 3 minutes and then cooled in the fridge. About ½ c of each will provide sufficient syrup for two 9” round cakes.

Crumb Coat – you know those pesky crumbs that get all mixed up in your frosting when trying to ice a cake? No more! I found out about doing a “crumb coat” which is basically a thin primer coat of icing before doing the real icing. You’re supposed to water it down (add milk or water), but I don’t necessarily do that. After a thin coat of frosting, refrigerate the cake for at least 30 minutes and then have at it. It will be much easier to frost your cake now. More about Crumb Coats.

Parchment Paper – this really only applies to cake recipes. Don’t you hate when you tip over your pan to release the cake and it sticks? UGH! Line the bottom of your cake pan with parchment. First grease the bottom, then stick the parchment to that, then grease & flour the parchment. I’m telling you, the cake will fall right out next time if you do this. *For round cakes, don’t try to cut a circle. Just cut a square the approximate size of the round pan, then fold as if you’re making a paper snowflake. All you have to do is trim the top and you’ve got a nearly perfect circle.*

Temperature – every ingredient should be at room temperature. This includes butter, milk, and eggs. There are two exceptions to this. First, whipping cream should be cold unless otherwise instructed. Second, if you are making pie crust and certain breads, all ingredients (including flour) should be cold. But, for your standard cookie/cake type recipe, work at room temperature if you have the time to do so. Butter at room temperature should be soft, not mushy. Mushy butter can make your cookies spread out into flat little pancakes in the oven. Trust me, I know.

Speaking of temperature, I recommend investing in an oven thermometer. They are only a few bucks and you may be surprised at how inaccurate your oven dial is. Mine is routinely off by 25-35 degrees. Granted, I have a cheap-o rental apartment oven, but you really never know what your temperature is if you’re relying on your oven dial.

Posted in Uncategorized | Tagged , , , , | 1 Comment

Zucchini & Ricotta Galette

I have to admit, I only started eating zucchini this year, and I still need it to be cooked in certain ways for me to really enjoy. Grilling is good. So I decided to give this recipe a whirl to expand my zucchini world.

A galette is basically a rustic tart, which if you think about it is a really good thing because tarts are supposed to look really pretty, and if it’s not “just so” then your tart is like the ugly duckling. But a galette is allowed, even supposed, to be imperfect. So a crooked crust is a-ok.

Galettes can be sweet or savory, and this one is of the savory variety and would be a perfect item to prepare for brunch.

Zucchini and Ricotta Galette

  • Servings: 8
  • Difficulty: medium
  • Print

source: Smitten Kitchen


Ingredients
For the pastry:
1 1/4 cups all-purpose flour, chilled in the freezer for 30 minutes
1/4 teaspoon salt
8 tablespoons (1 stick) cold unsalted butter, cut into pieces and chill again
1/4 cup sour cream
2 teaspoons fresh lemon juice
1/4 cup ice water

For the filling:
1 large or 2 small zucchini, sliced into 1/4 inch thick rounds
1 tablespoon olive oil plus 1 additional teaspoon
1 medium garlic clove, minced (about 1 teaspoon)
3/4 cup ricotta cheese
1/2 cup (about 1 ounce) grated Parmesan cheese
1/4 cup (1 ounce) shredded mozzarella
1 tablespoons slivered basil leaves

for the Glaze:
1 egg yolk beaten with 1 teaspoon water

Instructions
Prepare Dough

  • Whisk together the flour and salt in a large bowl. Sprinkle bits of butter over dough and using a pastry blender, cut it in until the mixture resembles coarse meal, with the biggest pieces of butter the size of tiny peas.
  • In a small bowl, whisk together the sour cream, lemon juice and water and add this to the butter-flour mixture.
  • With your fingertips or a wooden spoon, mix in the liquid until large lumps form. Pat the lumps into a ball; do not overwork the dough.
  • Cover with plastic wrap and refrigerate for 1 hour.

Prepare Filling

  • Spread the zucchini out over several layers of paper towels. Sprinkle with 1/2 teaspoon salt and let drain for 30 minutes; gently blot the tops of the zucchini dry with paper towels before using.
  • In a small bowl, whisk the olive oil and the garlic together; set aside.
  • In a separate bowl, mix the ricotta, Parmesan, mozzarella, and 1 teaspoon of the garlicky olive oil together and season with salt and pepper to taste.

Prepare Galette

  • Preheat oven to 400 degrees.
  • On a floured work surface, roll the dough out into a 12-inch round. Transfer to a baking sheet lined with parchment paper
  • Spread the ricotta mixture evenly over the bottom of the galette dough, leaving a 2-inch border.
  • Shingle the zucchini attractively on top of the ricotta in concentric circles, starting at the outside edge.
  • Drizzle the remaining tablespoon of the garlic and olive oil mixture evenly over the zucchini, sprinkle with salt and pepper
  • Fold the border over the filling, pleating the edge to make it fit. The center will be open.
  • Brush crust with egg yolk glaze.
  • Bake the galette until the cheese is puffed, the zucchini is slightly wilted and the galette is golden brown, 30 to 45 minutes.
  • Remove from the oven, sprinkle with basil, let stand for 5 minutes, then slide the galette onto a serving plate.
  • Cut into wedges and serve hot, warm or at room temperature.


Posted in Baking Jumbles | Tagged , , , , | 4 Comments

Pesto alla Genovese

Today I have a cooking jumble instead of a baking jumble for you all.

I have a window box of herbs, and needed to use some of my basil. The stuff is growing like a jungle faster than I can give it away. So, I decided to give pesto a shot considering I had all of the ingredients at home. I got this recipe out of a coffee table/cookbook called Culinaria Italy. Turns out, this is a super easy recipe and a great alternative to traditional red sauce on your pasta in the summer.

No kitchen catastrophes or cute stories to go along with this one, sorry.

Pesto-web

Pesto Alla Genovese

1 bunch basil (I doubt mine was a “bunch” but it worked)
1 clove garlic
2 T pine nuts
Coarse Salt
1/3 c grated pecorino cheese
1/3 c grated Parmesan cheese
2-3 T extra virgin olive oil

  • Chop basil, garlic, pine nut, and a pinch of salt in blender
  • Gradually add grated cheese and work into an even paste
  • Mix in olive oil by hand to a creamy consistency
  • Just before pouring over pasta, add some of the hot water from which the pasta was cooked

Posted in Cooking Jumbles | Tagged , , | Leave a comment

Chocolate Covered Brown Sugar Bacon

The third and final installment in the Chocobacon Fest recipes is here.  Chocolate Covered Brown Sugar Bacon.

I got this idea after eating Praline Bacon at Elizabeth’s in New Orleans.  For my version, I was originally calling it Chocolate Covered Praline Bacon but realized that without the pecans, that’s a bit of a misnomer.  (If anyone tries to modify this and add pecans, do let me know how it turns out.)

If I were to make this recipe again, I would drizzle chocolate over the bacon rather than dipping it in order to have a bit less chocolate.  A friend suggested making bite-sized pieces of bacon and to package/serve the treat as a candy.

No matter how you do it, though, it’s pretty outrageous.  In fact, a friend of mine, with stars in his eyes, proposed marriage to the Chocolate Covered Brown Sugar Bacon spear.  Very romantic.

Chocolate Covered Brown Sugar Bacon

Bacon
Brown sugar
Melted chocolate

  • Put bacon on cookie tray in oven at 350 degrees F, until nicely browned
  • Cover with Brown Sugar, pressing it into the bacon to make a caked layer
  • Cook for an additional 10 minutes
  • Remove from oven and cool on a plate
  • While cooling, melt your favorite chocolate on a double boiler or in the microwave to a dipping consistency.  Dip room temperature bacon spears in chocolate (or drizzle on top)
  • Cool to harden in refrigerator.
  • Indulge

Also on the Chocobacon Fest Menu: BLT Stuffed Tomatoes and Maple Chocolate Pudding with a Bacon Spoon

Posted in Bacon Jumbles, Baking Jumbles | Tagged , | 10 Comments

Maple Chocolate Pudding with a Bacon Spoon

The Chocobacon Coma continues, and the following recipe is no joke. 

This Maple Chocolate Pudding is so insanely delicious you might not be able to control yourself.  For the sake of decency, I cannot even post what a fellow Chocobacon Fest-er said upon tasting this treat.  Let’s just say it was REALLY good, and leave the rest up to your imagination.

This pudding is not like the standard Jello in consistency, rather it is a runny, gooey, delicious mess.  Also, do not be disappointed by the fact that this recipe yields only 5-6 servings of about 2 oz. each.  Your teeth would rot out of you had more than 2 oz.  Trust me.

Also, you will need at least 2 bacon spoons per serving.  What, you think you’re going to lick the pudding off of the bacon spoon with each magical bite?  No, no.  You’re not.  You’re going to bite a heavenly bit of bacon with each and every scoop of pudding and you are not going to feel guilty for it for even one second. 

As you can see in the pictures below, I had to serve the pudding in plastic cups because we were on a picnic.  But, it would look even better in glass tumblers should the situation allow.


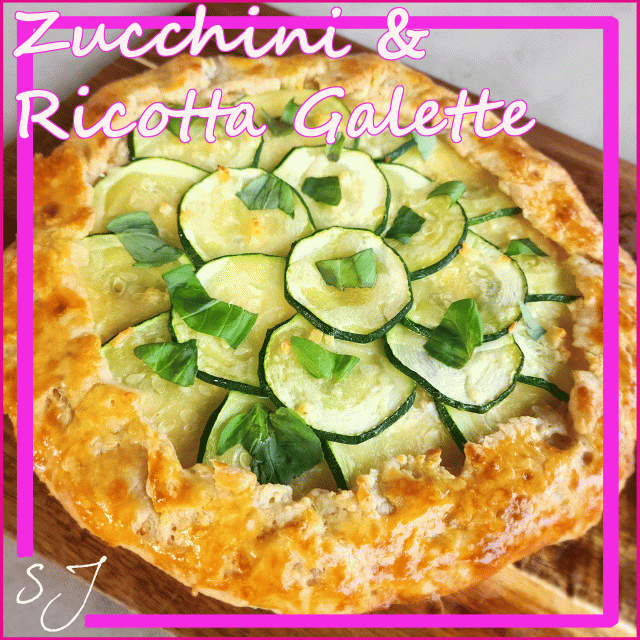
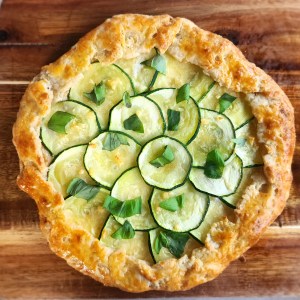
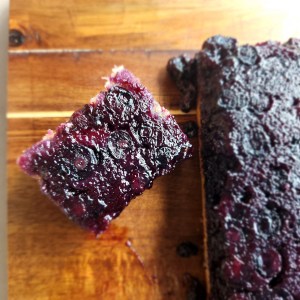
Maple Chocolate Pudding with Bacon Spoons
adapted from: Peace Love & Chocolate

5 oz milk chocolate, melted (I used 45% cacao)
3 oz heavy whipping cream
2 oz maple syrup, preferably Grade A amber
Vanilla bean, sliced in half and seeded (optional)
Bacon (I used maple bacon)

  • soak vanilla bean and scraped pod in heavy cream for anywhere from a few minutes to overnight
  • in a 375 degree oven, lay bacon in a single layer on baking sheet and bake until golden brown.  Remove, pat oil with papertowels, and set aside.
  • In a medium saucepan, bring cream and vanilla to a boil.  Once boil is reached, turn off heat and let cool for 10 minutes.  Remove pod. 
  • Melt chocolate on a double boiler or in microwave
  • Pour cream over melted chocolate and add maple syrup.  Using a whisk, combine to a glossy emulsion.
  • Fill glasses with warm pudding and serve with a bacon spoon (and extra spoons on the side!)

Also on the Chocobacon Fest Menu: BLT Stuffed Tomatoes and Chocolate Covered Brown Sugar Bacon

Posted in Bacon Jumbles, Baking Jumbles | Tagged , , | 3 Comments

BLT Stuffed Tomatoes and a Chocobacon Fest

This past weekend my friends and I had a Chocobacon Fest.

I will pause now so that you can catch your breath.  Yes, you are still alive.  No, you have not died and gone to Bacon heaven.  Yes, it really was that good.

Our menu included BLT stuffed tomatoes, bacon wrapped shrimp, bacon wrapped dates stuffed with almonds or chocolate, zucchini and squash sautéed in bacon grease, pomegranate sangria (ok, no bacon or chocolate there), maple chocolate pudding with bacon spoons, and chocolate covered brown sugar bacon.

Recipes for pudding and chocolate covered bacon will be posted later this week…once I pick myself up off of the floor from my Chocobacon induced coma.

For now, I offer you ….

BLT Stuffed Tomatoes
Source: Buns In My Oven

about 20 cherry tomatoes
8 ounces sour cream
4 slices bacon, cooked and crumbled
1 t grated parmesan cheese
2 t fresh parsley, chopped
chives, for garnish
salt and pepper to taste

  • Wash cherry tomatoes and slice them in half. Use a paring knife or spoon to scrape out the insides. Dab the inside of each tomato with a paper towel to dry it and then sprinkle with salt.
  • Mix together the sour cream, bacon pieces, parmesan, parsley, salt, and pepper. Spoon or pipe the filling into each tomato and sprinkle the tops with chopped green onions.


Also on the Chocobacon Fest menu: Maple Chocolate Pudding with a Bacon Spoon, and Chocolate Covered Brown Sugar Bacon

Posted in Bacon Jumbles, Cooking Jumbles | Tagged , , , | 4 Comments

Blueberry Upside Down Cake

Usually when you hear someone talking about freezing their eggs, they don’t mean the kind in their refrigerator.  Then again, most people don’t have the ghost of the Abominable Snowman living in their fridge.  Continue reading

Posted in Baking Jumbles | Tagged , | 2 Comments

Serendipity’s Frrrozen Hot Chocolate

This summer has been so hot that baking is often out of the question.  Days like these, you are better off just cooling off with a cold beverage.  So, today’s post is a simple way to make your taste buds smile. 

Serendipity’s Frrrozen Hot Chocolate originates in Serendipity 3, an NYC restaurant.  I’ve had the original there and this famous recipe was released directly from the restaurant for their 50th anniversary.  No tweaks, no caveats, just make it.

Serendipity’s Frrrozen Hot Chocolate
serves 2

6 half-ounce pieces of your favorite chocolate
2 t store-bought hot chocolate mix
1 1/2 T sugar
1 1/2 c milk
3 c ice
whipped cream
Chocolate shavings

  • Chop chocolate into small pieces and place in a double boiler over simmering water, stirring occasionally until melted
  • Add hot chocolate powder and sugar, stirring constantly until blended
  • Remove from heat and slowly add 1/2 c of milk and stir until smooth.
  • cool to room temperature
  • In a blender, place remaining cup of milk, the room temperature chocolate mixture, and the ice.  Blend on high speed until smooth and the consistency of a frozen daiquiri
  • Pour into a giant goblet, top with whipped cream and chocolate shavings, enjoy!


P.S. Cats like it too.  🙂

Posted in Uncategorized | Tagged , , , | 3 Comments