
 I wish summer would just get here already. It has been raining for nearly a week straight. I mean come on, sunshine, come out! May showers better bring June sun rays! I’m ready for my fruit and summer foods, warm-weather smoothies and burgers from the grill! I’m going camping in a few weeks, so seriously, I need the warm, dry weather to hurry up and get here. Continue reading
Pink Grapefruit Mini Cupcakes
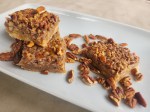
Maple Pecan Squares
 I don’t know what part of the country you’re in, but where I am everybody is sniffing; allergies are in full swing. I was told that they’re so bad this year that most over-the-counter stuff doesn’t work. Who knows if that’s rumor or fact, but I tell you what, my drugs barely made a difference. My head felt like exploding and I was running a low-grade fever. I was the picture of miserable this past Thursday!
I had a party to attend on Saturday night, and I had volunteered to bring something sweet. I prepared these Maple Pecan Squares which had been a hit at a baby shower a few years ago and I knew they would be easy to transport and wouldn’t require any sort of utensils. Perfect.
However, Saturday night rolled around and I still wasn’t feeling so hot. Neither I nor my Maple Pecan Squares made it to the party. Major bummer. So, my coworkers are now indulging in the sweets and I’m feeling semi-better. I think eating a few of the Squares myself helped. In fact, they may have been more effective than the medicine. 🙂
Maple Pecan Squares
source: Williams-Sonoma

Ingredients
for the crust:
1 1/4 c all-purpose flour
1/3 c firmly packed brown sugar
1/4 t salt
8 T (1 stick) cold, unsalted butter, cut into pieces
for the filling:
6 T unsalted butter
1/3 c pure maple syrup*
2/3 c firmly packed brown sugar
1/3 cup heavy cream
1 3/4 – 2 c coarsely chopped pecans
Instructions
- Preheat oven to 350. Line a 9-inch square baking pan with foil, leaving a bit to overhang the edges for easy removal after baking. Butter the foil liner.
- Mix together flour, brown sugar, and salt by hand. Using a pastry cutter, add the butter until coarse crumbs the size of peas form. (This can also be done in a food processor.)
- Press the crumb mixture into the bottom of the prepared pan. Bake until the edges are lightly browned and the top feels firm, about 15 minutes. Set aside.
- To make the filling, in a saucepan over medium heat combine the butter, maple syrup, and brown sugar. Stir until the butter melts and the brown sugar dissolves. Bring to a boil for 1 minute.
- Remove from heat and immediately stir in the cream, then add the pecans.
- Pour over the crust, spreading evenly. Return to the oven for 25 minutes, or until the filling is set. During baking the filling will bubble vigorously and then subside towards the end of baking. It will still be jiggly when you remove it from the oven.
- Transfer to a wire rack and cool for 1 1/2 hours. Refrigerate to expedite setting. Remove from pan using foil liner and cut into 25 squares. Store at room temperature or refrigerated.
*I have made these with both maple syrup and fake syrup (like Aunt Jemima). Both work fine. Calorie count will need to be adjusted accordingly.
calories: 170
Dulce de Leche Cheesecake Bars for Cinco de Mayo
Cinco de Mayo is right around the corner so I have baked a special Mexico-inspired treat for you! Sorry, no cute story to go along with it this time, but I hope you enjoy the sweets!
Dulce de Leche Cheesecake Bars
adapted from: Smitten Kitchen

For Dulce de Leche:
14 oz. sweetened condensed milk
For crust:
1 c graham crackers, crushed
2 T sugar
3 T unsalted butter, melted
For cheesecake:
1 t unflavored gelatin (about 1/2 of an envelope)
1/4 c milk
8 oz. cream cheese, softened
2 large eggs
3/8 t salt
For glaze:
3 oz. bittersweet chocolate, coarsely chopped
1/4 c unsalted butter
2 t light corn syrup
- Pour 1 can of sweetened condensed milk into double boiler over boiling water and cover. Cook over low heat, stirring occasionally, for 40-50 minutes or until slightly thickened and a light caramel color. Remove from heat and whisk until smooth.
- Preheat oven to 325 degrees. Line bottom and sides of 8×8″ pan with foil.
- In a food processor, crush graham crackers. In a small bowl, combine graham crackers, salt and melted butter, mixing with a fork until well moistened. Press firmly into bottom of baking pan and bake for 10 minutes. Cool for 5 minutes.
- Meanwhile, sprinkle gelatin over milk in a small bowl and let stand for 2 minutes. Beat together cream cheese, eggs, salt, and gelatin with a mixer at medium speed until well combined. Mix in dulce de leche until just combined.
- Pour filling over crust, smoothing the top, and bake for about 40 minutes or until the center is just set. Cool at room temperature for 2 hours and then chill for 6 hours or overnight.
- Heat all glaze ingredients in a double boiler, stirring until melted and smooth. Pour over cheesecake, tilting to coat top evenly. Chill, uncovered, 30 minutes.
- Remove cheesecake from pan using foil overhang and cut into squares. Clean your knife between each cut to get perfect squares.
- Enjoy!
")
serves: about 16
calories: 225
Posted in Baking Jumbles
Tagged cheesecake, chocolate, cinco de mayo, dulce de leche
Leave a comment
Lemon Shortbread good enough for a Royal Wedding
I am so not into the royal wedding. Ok Will & Kate, we’re all happy for you, now you can go away. The Snow White soundtrack has been running through my head: “Someday my prince will come…”, as I wonder if Kate might be literally singing this in her head too (while surrounded by newborn woodland animals and a bunch of short men at her service, of course).
Considering my disinterest, today’s post might seem a bit ironic, but I swear I did not do this on purpose.
Last night I made lemon shortbread, simply because I had some lemons on hand. It was not until this morning, as I’m carrying the treat in to my office, that I think to myself “hmm, last time I had shortbread I was in London.…” And from there, it was obvious that this post would have to mention the royal wedding, whether I like it or not.
So, Kate, wear your frilly hats and enjoy low tea (with lemon shortbread) and feel like the princess that you now really are. I hope that your wedding is for you and not for the spectacle of it all, and I hope that your happiness is forever. But, after the big day, could you all please just go away for a bit? Enough already! And by the way, I heard you put a unicorn on your new coat of arms. What were you thinking!?
Lemon Shortbread
source: Lick the Bowl Good

3/4 c (1 1/2 sticks) unsalted butter, room temperature
3/4 c powdered sugar
1 T lemon zest
1/2 t lemon extract
1 c all-purpose flour
1/2 c yellow cornmeal
1/4 t salt
2 T turbinado/sparkling sugar (like sugar in the raw) (optional)
- Preheat oven to 325 degrees. Grease sides and bottom of an 8×8″ baking pan, line with parchment paper, and set aside.
- With a mixer, combine butter, sugar, lemon zest and lemon extract until light and creamy – about 3 minutes.
- Add flour, cornmeal, and salt, mixing on low until moist clumps form.
- Spread dough into pan into a smooth layer. (You’ll probably have to use your hands.)
- Using a knife or bench scraper, cut bars into the raw dough. Sprinkle with turbinado sugar (optional).
- Bake 35-45 minutes, until bars are golden on top. Immediately re-cut the bars on the pre-scored lines. (Don’t wait or they’ll be too crumbly to cut.)
- Cool completely and remove from pan using parchment paper overhang.

serves: 16
calories: 150
Tembleque (I’m not Puerto Rican)
I’m not Puerto Rican. (Shocking, I know.)
I have a strange and complicated love affair with the island of Puerto Rico. It’s like a love-hate relationship. Or perhaps I just hate to love it. Or love to hate it. Either way, it’s one of those places that I actually have an emotional relationship with. (The others being New York City, Pittsburgh, and Cuba….) How this all came to be I really can’t say. Perhaps it’s the people, or the memories…the music…the climate. I know the language better than I let on once I get into practice. I love it enough that I visit when I can, and I would move there for a good reason. But, all the while I’d say “coño, Puerto Rico!”
But one thing that stands the test of my ups and downs is the food. Oh la comida de la islita! Want to make me happy, feed me mofongo con pernil. Maduros on the side, por favor. Seriously, if you haven’t indulged in some Puerto Rican food, do so. If you don’t live in a place with an abundance of restaurants just go to the island. 🙂
I was craving something sweet to remind me of warmer, sunnier, carefree times, so I decided to make tembleque. Tembleque is a coconut custard common to Puerto Rico, and it’s extremely easy to make. It can be served in small custard dishes similar to pudding, or inverted and taken out of a mold like a panna cotta. (For my photo I did a mold, but that’s just because it looked better.) Enjoy!
Tembleque

1 13.5 oz can of coconut milk
1/2 c granulated sugar
1/2 c cornstarch
1/4 t salt
1 t vanilla
cinnamon
- In a medium saucepan over medium heat, combine milk, sugar, cornstarch, and salt. Heat until thick, whisking continuously to prevent lumps from forming.
- Add vanilla, stir, and remove from heat.
- Pour into individual custard/dessert cups, ramekins, or a mold. Refrigerate for several hours until cool.
- Sprinkle with ground cinnamon and serve.
Serves: 4
Calories: 325
Posted in Baking Jumbles, Slutty Jumbles
Tagged coconut, custard, pudding, Puerto Rico, tropical
1 Comment
Honey Vanilla Bean Marshmallows – Happy Easter
Happy Easter! Here’s wishing you a season of life and hope!
Admit it – you like Peeps. You are a grown adult and you like those sugar-y marshmallow-y bunnies and chicks. You like to squish them and bite their heads off. You’ve probably experimented with them in the microwave and in a boiling pot of water just to see what would happen. Admit it! You like the feeling of your teeth rotting as you eat away. And do you ever stop at just one peep? Ha – UNLIKELY!
What would easter be without Peeps? I cannot imagine.
In honor of the beloved Peep, I have decided to provide you with a marshmallow recipe for Easter. No, it’s not a nearly-flourescent color – sorry. But, on the bright side, your teeth will not hurt after eating them!
NOTE: The recipe below can be halved, just use an 8×8″ pan. That’s what I did and it worked perfectly.
Honey Vanilla Bean Marshmallows
from Joy the Baker
")
1 c cold water, divided
3 1/4-oz packages unflavored gelatin
1 1/2 c granulated sugar
1/4 c honey
2/3 c light corn syrup
1/4 t salt
2 t vanilla extract
half of a vanilla bean, seeds scraped out and reserved, or equivalent in vanilla paste
1/2 c cornstarch
1/2 c powdered sugar
- In a small bowl, whisk together cornstarch and powdered sugar. Set aside.
- Spray a 9×13″ baking pan with non-stick cooking spray and coat with the powdered sugar and cornstarch mixture (there will be extra). Set aside.
- Pour 1/2 cup cold water into the bowl of a stand mixer fit with a whisk attachment. Add the three gelatin packs over the cold water and let sit for about 10 minutes.
- Meanwhile, in a medium saucepan over medium heat, bring sugar, honey, corn syrup, salt and the remaining cold water to a boil. Stir to dissolve the sugar.
- Attach a candy thermometer the side of the pan and bring mixture to 240 degrees F. (No need to stir after sugar has dissolved, just let it heat.)
- When the sugar reaches 240 degrees F, start the mixer with the gelatin and water on low speed. Carefully add the hot sugar mixture into the bowl, while gradually increasing the speed of the mixer.
- Beat on high for several minutes until a thick, fluffy, white marshmallow batter has formed (about 8 minutes). Pour in the vanilla extract and vanilla bean and beat for another 2 minutes.
- Spread the marshmallow mixture into prepared pan and smooth with a clean, wet spatula to prevent sticking. Top marshmallow with more of the powdered sugar mixture and let set and firm up for at least 4 hours, or overnight.
- Once set, remove marshmallow from the pan (it should come right out) and use a pizza cutter coated with non-stick cooking spray to slice marshmallows. Toss the cut marshmallows in the remaining powdered sugar mixture and store in an airtight container for up to one week.

serves: +/-40, depending on size
calories: 62
Caramel Brownies
You may all remember that last October I had a bit of an … incident. With a knife. The knife and my finger had a little fight over a butternut squash and the knife won. Well, as a follow-up, this past week my friend and I took a Knife Skills class and I bought a brand new very sharp chef’s knife. The class was held at The Brooklyn Kitchen, and for any of you locals I highly recommend you check it out. I’ve taken two classes there so far, and am anxious for another one down the road. In fact, the class was so well suited for me that within the first five minutes the chef/teacher mentioned the dangers of cutting up butternut squash. (I informed him that I was his case study for that comment.)
Conveniently, my new chef’s knife is perfect for chopping chocolate, too!
I know my month’s theme is recipes of significance to me, but this one is a bit of a cheat. Brownies are something I, like most of you I’m sure, ate as a child. So, this is a brownie recipe. But, I’m still trying to use up some leftover caramel sauce so I doctored up a brownie recipe to make it a Caramel Brownie recipe, and I have gotten two thumbs up from my official taste-testers. I assure you the brownies taste better than the photo suggests – they just aren’t very photogenic things. What can I say, the ugly duckling is always a winner in the end.
Caramel Brownies

1/2 c unsalted butter, softened
6 oz bittersweet chocolate, coarsely chopped
3/4 c granulated sugar
2 large eggs
1/2 T vanilla extract
1 1/4 c all-purpose flour
1/2 t salt
1 c (+/-) caramel sauce (see below)
- Preheat oven to 350 degrees. Line an 8″x8″ baking pan with foil and grease well with butter or cooking spray.
- Heat butter and chocolate in a double boiler, stirring continuously until completely melted and smooth. Remove from heat.
- Whisk in sugar, eggs, and vanilla extract until incorporated. Stir in flour and salt until just combined.
- Spread half of the brownie batter in the pan, creating an even layer. Bake for 20 minutes.
- Meanwhile, prepare caramel sauce.
Caramel Sauce options:
recipe from Banana Cream Pie
or
store-bought caramel ice cream topping
or
7 oz caramel candies and 1/6 c heavy cream (combine in small saucepan over medium heat, stirring regularly until smooth)
- Remove layer 1 of brownies from oven and immediately spread 1 c (+/-) of caramel sauce on top. Pour the remaining brownie batter over the caramel, being careful to have a smooth, even layer because it is hard to smooth out without disturbing the caramel underneath.
- Bake for another 20 minutes.
- Remove from oven and cool completely before slicing. (Easily remove brownies from pan using edges of foil lining,)
serves: 20
calories: 197 (varies based on caramel chosen)
Lemon Bars
As you may recall from my last post, this is my birthday month. As such, I’m featuring recipes that are tried and true, ones that I grew up on. A few of my favorite things, so to speak.
Which, unfortunately, makes me sing in my head that song from “The Sound of Music.” I strongly dislike “The Sound of Music.” Confession: I find it semi-creepy. Not the Nazi thing, I mean that’s creepy but that’s for real. The creepy part is the weird singing/dancing lining up to say goodnight type stuff. So I really don’t want it in my head.
Girls in white black dresses with blue satin sashes awesome green heels, snowflakes sand that stays on my nose toes and eyelashes. Silver white Unseasonably warm winters that melt into springs summers. These are a few of my favorite things….
Annnnnyway. Now that I have gotten that song stuck in your heads too 😉 I can continue on.
My next treat is the traditional Lemon Bar. (At least it was fairly traditional in our house.) When I was little, my mom worked part-time in a coffee & tea shop before going back to work full-time. Sometimes we’d go pick her up (because, I mean, in 1983 families surely didn’t have two cars!) and Lemon Bars were my second favorite thing to eat there. My first favorite thing was rock candy. What 7-year-old in her right mind would pass up crystallized sugar on a stick? Yeah, not me. So, dear Lemon Bar, you get the silver medal and rock candy takes the gold.
This recipe is for those Lemon Bars. I’m not entirely sure how to make rock candy, but I imagine it’s a fairly simple science experiment. But for the sake of dental health, I’ll pass on that (for now…).
Lemon Bars

2 c all-purpose flour
1 c butter, softened
1 1/2 c powdered sugar + more for topping
4 large eggs
2 c sugar
1 t baking powder
4 T lemon juice (yup, I used the stuff out of the bottle!)
- Preheat oven to 350 degrees
- Mix together flour, butter, and powdered sugar until crumbly. Spread and press into a 9×13″ pan.
- Bake for 20 minutes.
- Beat eggs well. Add sugar, baking powder, and lemon juice. Pour over crust immediately upon removing it from the oven.
- Return to the oven and bake for 25 more minutes. It should be a little jiggly in the center but not too much. If it’s really jiggly, return to oven for 3-5 minutes.
- Sprinkle with powdered sugar while still hot.
- Refrigerate and cut into bars when cool.
serves: 24
calories: 212
Chocolate Chip Cookies & ice cream sandwiches
IT’S MY BIRTHDAY MONTH!
That’s right, month. I was celebrating at 12:01am on April 1 and if I want to be celebrating at 11:59pm on April 30, so be it. I will be celebrating being older than I look, and looking younger than I am. I will be celebrating living out loud and quiet nights at home, and enjoying both. I will celebrate by dancing my heart out and singing really loud; by getting an old tattoo touched up; by jumping out of a plane; by watching, in awe, the turn of events with these daggone NCAA Tourney Basketball games; by taking it up a notch at the gym; by eating anything I want!
So, this month I will be featuring recipes that I love. Many I grew up with, and others I came across somewhere along the way and have added them to my favorites. Despite being a baker, my favorite treat ever, in the whole entire history of the universe, is ice cream. The guy who invented ice cream deserves and award. Like, maybe the Nobel Peace Prize. Seriously. I think if you have people fighting, if you just give them all a scoop they can probably come to peaceful terms. Ice cream is that magical.
To start off, I’m featuring good ol’ chocolate chip cookies. I’m pretty sure these are one of the first things I ever baked. I have no idea where the recipe came from, because after all these years, it is titled “Kristin’s Favorite Chocolate Chip Cookies”. For all I know, it came off the back of a bag of chocolate chips from one of the big-bad chocolate companies. But, from here until forever, they are simply “Kristin’s Favorite…”.
And, to make things even better, I have turned them into ice cream sandwiches. Oh yeah, I went there. It’s my birthday month, I can do that.

Kristin’s Favorite Chocolate Chip Cookies
1 c butter, softened
3/4 c sugar
3/4 c brown sugar
1 t vanilla extract
2 large eggs
2 1/4 c all-purpose flour
1 t baking soda
1/2 t salt
2 c chocolate chips
-
Preheat oven to 375 degrees.
-
In a large bowl, sift together flour, baking soda, and salt. Set aside.
-
In a mixer, cream together butter, sugar, brown sugar, and vanilla until light and fluffy. Add eggs, one at a time, beating well.
-
Add flour mixture, gradually incorporating into butter mixture until well combined.
-
Stir in chocolate chips.
-
Drop cookie dough onto ungreased cookie sheets. AS BIG AS YOU WANT! Bake for 8-10 minutes, or until lightly browned.
-
Cool slightly and remove from baking sheet.
But the fun doesn’t stop there. I had leftover chocolate and caramel sauces from my last blog post on Banana Cream Pie. Can’t let that go to waste, can we? So, I took some room-temperature chocolate and spread a nice layer on the back of one cookie. Freeze for 5 minutes to firm up. Add a dollop of caramel on the chocolate, again freezing for 5 minutes to firm up. Next, add a scoop (or two or three) of your favorite ice cream, top with second cookie, and gently press to create a sandwich.
")
Delish! Happy Birthday to MEEEE!
")
Posted in Baking Jumbles, Ice Cream Jumbles
Tagged chocolate, chocolate chip, Ice Cream Jumbles
4 Comments
Emeril’s Banana Cream Pie
About a year ago my friend Elizabeth and I traveled to New Orleans for an extended weekend. We had a great time, exploring everything from the French Quarter to the Lower Ninth Ward. But, as many visitors to NoLa will attest, the highlight of the trip was eating. Constantly. Po’Boys, check. Fried alligator, check. Fried pickles, check. Jambalaya, check. Beignets, check. Praline bacon (OMG!), check. Pralines, check. The list goes on and on.
One night we went for dinner at Emeril’s. The highlight was his famous Banana Cream Pie. Best Banana Cream Pie ever. Despite immediately deciding that I would have to try to recreate this, I foolishly neglected to take notes on the treat and now it’s a year later and I can’t exactly remember the details. I did find his recipe online, but I’m not completely convinced that it’s the identical recipe that is used at Emeril’s Restaurant. Nevertheless, it’s pretty darn good.
I did, however, change the caramel sauce. I’m sure Emeril would not have a bad caramel recipe, but I have made caramel before with no problem and his original recipe totally did not work for me. So, rather than try and try again, I just dug out an old tried and true caramel recipe and have included it below.
Emeril’s Banana Cream Pie

for the pie
3 c graham cracker crumbs
1/2 c sugar
1/2 ripe banana, mashed
1/2 c butter, melted
3 lb bananas (about 9), cut crosswise into 1/2 inch slices (ripe but still firm)
5 large egg yolks
1/4 c cornstarch
3 – 3 1/2 c heavy cream
2 c sugar
1 vanilla bean split and scraped OR 1 T vanilla bean paste
Crust
- Preheat oven to 300 degrees.
- In a mixing bowl, thoroughly combine graham cracker crumbs, sugar, and mashed banana. Add butter and mix well.
- Press mixture into a 9″ cake (or pie) pan. The crust will be quite thick. (Note: If you are using a pie pan, the pie will likely be higher than the pie when all is said and done. A cake pan will more likely contain everything.)
- Bake until browned, about 30 minutes.
- Remove from oven and cool for about 10 minutes.
Custard
- Meanwhile, to prepare custard filling combine egg yolks, cornstarch, and 1 c of the heavy cream. Whisk to blend well. Set aside.
- Combine 2 cups of heavy cream, sugar, and vanilla into a large saucepan over medium heat. Whisk to dissolve sugar and bring to a gentle boil for about 10 minutes.
- Slowly add egg yolk mixture to the cream, whisking constantly until it thickens (about 5 minutes) If this begins to look curdled, that’s ok.
- Pour custard into a large bowl, cover surface with plastic wrap, and bring to room temperature.
- If you used a vanilla bean, remove once cool. With an electric mixer, whip room-temperature custard at medium speed to re-combine. If it will not combine, add another 1/2 cup of heavy cream.
Assembly
- Spread 1/2 c of custard on the crust. Arrange about 1/3 of the banana slices, crowding them close together, over the custard.
- Spread 1 c of custard over the first layer of bananas. Arrange another 1/3 of the banana slices over the custard.
- Spread another 1 c of custard over the second layer of bananas, and another 1/3 of the banana slices over that.
- Last, top with remaining custard, covering bananas completely to prevent browning.
- Cover with plastic wrap and chill for at least 4 hours to set.
Optional toppings:
- shaved chocolate
- powdered sugar
- whipped cream
- caramel sauce (see below)
- chocolate sauce (see below)
Caramel Sauce
1 c sugar
1/2 c water
1 c heavy cream
1 T corn syrup
- In a small saucepan, combine sugar and water, bringing mixture to boil (300 degrees on candy thermometer). Lower heat and continue cooking until mixture is a deep caramel color (350 degrees on candy thermometer) and begins to smoke lightly. Remove from heat and stir in cream and corn syrup. Return to high heat and boil until you reach the consistency of thick syrup. Mixture will continue to thicken as it cools.
- You can make this ahead of time and refrigerate until ready to use. Bring to room temperature before serving.
Chocolate Sauce
3/4 c half-and-half
1 T butter
1/2 lb. (8 oz) semisweet chocolate
1/4 t vanilla extract
- Combine half-and-half and butter in a small saucepan over medium heat. Heat until a thin paperlike skin appears on top, but do not boil. Add chocolate and vanilla until chocolate melts and mixture is smooth. Remove from heat and cool.
- You can make this ahead of time and refrigerate until ready to use. Bring to room temperature (a few seconds in microwave) before serving.
")
serves: 20
calories: 392 (not counting toppings)
Posted in Baking Jumbles
Tagged banana, banana cream pie, banana creme pie, emril, emril lagasse, new orleans
6 Comments
