
 Since my last post, I visited Haiti where I helped build homes for those who lost them in the earthquake nearly 2 years ago. I kind of suspected that I’d come back with no good baking recipes to share, and I was right. We had no desserts, and overall the food left a bit to be desired. This surprised me a little bit since I really love Dominican food; the similarities ended at rice and beans. Several times we were fed fish spaghetti, which is basically plain spaghetti noodles with fish juice. Seeing as I don’t like fish, this was especially delicious. Continue reading
Easy(ish) Chocolate Babka
Key Lime Parfaits and a Baby Shower
During the past several weeks I spent my time preparing a menu for my sister’s baby shower. Not only was I preparing a menu, but I was doing “test runs” on various items which we planned to serve. The theme of the shower was simply green & tan (gender neutral colors planned for the nursery) and so I decided to go all the way and made the food (well, most of it) green. Not like artificial weird neon green, but more or less natural.
I couldn’t exactly tell you all about my kitchen adventures during this time since my sister reads the blog! You escaped the drama of the four different batches of key lime custard, four different icings, and the four tiered cake that had to be mostly thrown out simply because there was nobody to eat it! (Four seems to be a theme, for some unknown reason….)
After all was said and done, the menu included the following:
- Chicken salad in phyllo cups
- Herb Apple Tea sandwiches
- Cucumber Hummus tea sandwiches
- Cake
- Key Lime Parfaits
- Cake Pops
- Sugar Cookies
- Lime & sherbet punch
- Veggies & dip
My mom made half of the stuff (mostly the savory stuff) and I made the other (sweeter) half. Here are a bunch of photos for your enjoyment. I will include the recipe for the Key Lime Parfaits at the bottom of this post.


P.S. I head out of town tomorrow for 10 days in Haiti where I’ll be doing some post-earthquake rebuilding. I don’t expect it to be a culinary adventure so don’t count on any trip-inspired recipes upon my return. But hey, ya never know!
Key Lime Parfaits
adapted from Cooking Light

Custard Layers:
1/2 c key lime juice (or fresh lime juice)
1/4 c sugar
1/4 t grated lime rind
2 large eggs
1 (14-oz) can of fat-free sweetened condensed milk
-
Combine ingredients in a large bowl, whisking until smooth.
-
Pour into a double boiler. Cook over simmering water, stirring constantly, until mixture thickens (it will be over 160 degrees) and will coat the back of a spoon.
-
Remove from heat and bring to room temperature. Custard will thicken as it cools.
Graham cracker layers:
3 T unsalted butter
3 T sugar
1/2 c graham cracker crumbs
-
Melt butter in a skillet over medium heat. Mix in sugar until bubbling, about 1 minute.
-
Mix in crumbs, stirring until color deepens, about 3 minutes.
-
Remove from heat and cool.
-
Assemble alternating layers of custard and graham crackers. Top off with some fresh whipped cream and lime zest.
serves: 4
Peanut Butter Cup Blondies & learning to make gelato
This past Thursday one of my friends and I took a gelato making class here in New York City. The class was offered by Mia Chef Gelateria, and they hold it on a daily basis. This 6-student class takes place in the basement of the cafe, with a very relaxed and friendly atmosphere. Included in the cost of the class is take-home gelato; we made four flavors and every student got to take home a pint of each flavor.
Along with the fun hands-on instruction, we did actually learn a little. For example, the difference between ice cream and gelato is that gelato has less air in the mixture, making it more dense and flavorful. Also, since gelato is made with more milk land less cream (the opposite of ice cream), it’s healthier than ice cream. Therefore, in my head logic concludes that it is fine to have an extra scoop or two. Right?
The flavors we made were Cookies & Cream, Tequila & Fig (a twist on Rum Raisin), Snickers, and Ferrero Rocher. All were delicious, though my personal favorite was Snickers.
I would recommend any local New Yorkers with a sweet tooth consider taking a class here. Or, just stop by for some very tasty (and unique) flavors.
Here are two pictures from the gelato class.


In my own kitchen, this week I made Peanut Butter Cup Blondies. Like the Snickers gelato (both combining peanut butter and chocolate) almost everybody in the universe except my own mother will appreciate this combination. The recipe is easy, and healthy(-ish) because I pulled it from Cooking Light. Enjoy!
Peanut Butter Cup Blondies
source: Cooking Light

1 ¼ c all-purpose flour
1 c sugar
½ t baking powder
1/3 c creamy peanut butter
¼ c butter, melted and slightly cooled
2 T milk
1 t vanilla extract
2 large eggs, slightly beaten
¼ c semi-sweet chocolate chips
4 large peanut butter cups (or 12 minis), coarsely chopped
- Preheat oven to 350. Spray 9-inch baking pan with cooking spray.
- Sift (or whisk) together flour, sugar, baking powder and salt. Set aside.
- In a separate bowl, combine peanut butter, melted butter, milk, vanilla, and eggs.
- Add peanut butter mixture to flour mixture, stirring to combine. Stir in chocolate chips.
- Scrape batter into prepared baking pan. Arrange chopped peanut butter cups over the batter.
- Bake for 20 minutes or until toothpick comes out with moist crumbs. Cool on wire rack. Serve and enjoy.
serves: 20
calories: 153
Posted in Baking Jumbles, Urban Jumbles
Tagged blondies, gelato, mia gelateria, peanut butter, peanut butter cups
4 Comments
Basil Ice Cream
I’m in denial.
September is not here in my mind. Summer is not leaving me.
At the very least I believe we will have an Indian Summer. Like, pretty much through December, if you don’t mind. My latitude clearly does not complement my attitude, because I should be living in a warmer climate.
Fortunately, I did get a beach day in this weekend, so all hope is not lost.
I wonder how nasty it would be to cover my bathroom floor with sand. Hmmm. Probably nasty. But, I do wonder…. Nah, nix that, I think a certain feline might mistake that for a litter box. Definitely nasty. Must find ways to hang on to summer….
In light of this denial, I am still refusing to bake anything that I categorize as “fall-ish”. Fall-ish would include things made with pears or apples or cranberries. Those things are for crisp days, not for beach days. So, this past week I made an ice cream dish. Truth be told it was unimpressive, however a portion of it was worthy of blog recognition – vanilla basil ice cream. You don’t even make the ice cream, so those of you without an ice cream maker, fear not! This is super simple and barely merits being called cooking/baking, but it is yummy and unique and I think your dinner guests will be impressed. (Next time I’m going to try this with mint…same concept!)
Basil Ice Cream
")
1/4 c sugar
1/4 c water
1/4 c packed basil leaves
2 pints vanilla ice cream, softened
-
In a small saucepan, combine sugar and water. Bring mixture to a boil and add basil leaves. Blanch just until wilted, about 30 seconds.
-
Let cool and transfer to a blender. Puree until smooth. Let puree continue to cool.
-
In a medium bowl, stir cooled basil puree into the vanilla ice cream, leaving visible streaks.
-
Refreeze until firm.
")
Chocolate Nutella Fudge with Sea Salt
Good afternoon, everyone! I am writing to you as I await the arrival of Hurricane Irene. The media and social hype for the storm is quite entertaining. By the time it gets to the New York City area I suspect that it will be little more than a tropical storm. So why did people go buy gallons of milk and dozens of eggs? I do not know. And do they not realize that these eggs and milk will go bad if and when we lose electricity? Silly, silly people. And evidently people don’t have a few extra rolls of toilet paper and batteries at home either, since everyone seemed to suddenly need them. Either I’m uber-prepared by the fact that I have batteries sitting around, or they’re just crazy. I’m leaning towards the probability that they’re crazy….
Earlier this week – post-earthquake (which I didn’t feel anyway – BOO) and pre-hurricane – I made some fudge that was quite delicious. Here’s what my bossman said:
I walk into boss’ office.
Bossman: You’re going to hell.
Confused look on my face. Pregnant pause.
Because that fudge is SINFUL.
Ok bossman, you’re a riot. Glad you liked it…I think.
Chocolate Nutella Fudge with Sea Salt
source: Giada DeLaurentiis
")
Butter for greasing pan
1 can sweetened condensed milk (14 oz)
1 t vanilla extract
8 oz bittersweet (60%) chocolate, chopped (or use chips)
1 c Nutella, room temperature
3 T unsalted butter, room temperature and cut into 1/2″ pieces
1/2 t sea salt
- Grease bottom and sides of 8×8 pan with butter. Line with paper, leaving 2″ overlap on sides. (The butter just holds the parchment in place.)
- In a double boiler, combine sweetened condensed milk, vanilla, chocolate, Nutella, and butter. Stir until chocolate and butter have melted and are smooth, about 5-7 minutes.
- Pour mixture into the prepared pan, smooth with spatula, and sprinkle with sea salt. (You can use more or less to taste.)
- Refrigerate until firm, at least 2 hours.
- Remove fudge from pan using parchment overlap, and peel off the parchment paper. Cut the fudge into 3/4″ squares, using a warm, clean knife with each cut. (To warm it, run it under hot water.)
- Store in the refrigerator in an airtight container.
")
makes 50 pieces
calories per piece: 85
Blueberries & Cream Popsicles
This past weekend I went to Atlantic City for a quick visit. Man, that place is weird. Can’t be bothered to find a bathroom? No problem, here’s a wall. Can’t be bothered to find your pants? No problem, your shirt almost covers your butt. Feeling short? The boardwalk, with all of its planks and gaps would obviously be the perfect place to wear platform stilettos (preferably with your pants-less outfit, of course). I mean really! And just because a restaurant tells you that you have a 45 minute wait, that is pretty much the same as a 90 minute wait in their opinion, so don’t expect to be seated anytime before your stomach starts eating your own internal organs. Sheesh.
I did, however, get to come home with a box of salt water taffy, which is a treat in and of its self.
This recipe has zero to do with Atlantic City or salt water taffy, but I just felt like sharing.
Instead, my recipe is for Blueberries & Cream popsicles. It was one of those days where I had several ingredients in my refrigerator and realized that they all could be combined to make something tasty. And boy were these good and easy. I should note that the recipe instructs you to layer the blueberry and cream layers and then do a little swirl. Because my popsicle molds are narrow and rocket-shaped, this wasn’t really practical so I combined everything together prior to filling the molds, bypassing the decorative swirl element. They taste the same, but that’s why my photos look the way they do.
Yum Yum!
Blueberries and Cream Popsicles
source: Everyday Food Magazine
")
6 oz (1 c) blueberries (fresh or frozen)
3/4 c sugar, divided
1 c plain yogurt, low fat
1 c heavy cream
- In a small saucepan, bring blueberries and 1/4 c sugar to a boil over high heat. Reduce heat and simmer, crushing berries with a wooden spoon, until syrupy. Transfer to a small bowl and refrigerate until cool, at least 30 minutes or as long as overnight.
- In a medium bowl, whisk together 1/2 c sugar, yogurt, and cream until sugar dissolves.
- Pour the yogurt and blueberry mixtures into popsicle molds, alternating them to make several layers of each. Swirl together with a skewer, insert handles, and freeze until solid.
")
PS Cats like them too. 🙂
servings: 8
calories: 200
Frozen Whipped Lemon Pie
Summertime, and the livin’ is easy. 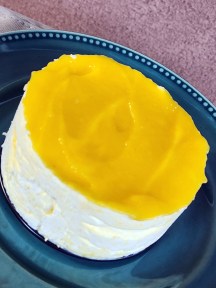
I love summer. Love, love, love. Earlier this week I returned from a long weekend in Puerto Rico. Sun, sand, surf. Music, dance, food. Pretty much all of my favorite things. Passion fruit shaved ice, tembleque gelato (brilliant!), mofongo, maduros, piña coladas. I ate and ate and ate. I came home and had salad and veggies for three days to try to get a healthy feeling back, but those four days of food were good while they lasted. This weekend I anticipate making some rice and beans, but that recipe won’t be blogged because, frankly, it can’t be put into words very well and it’s one of those things that just happens…. Continue reading
Blueberry Coffee Cake with Cinnamon Streusel Topping
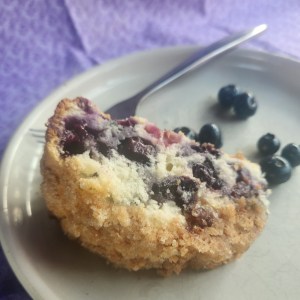 I know, I haven’t posted to Sweet Jumbles in, like forever. Maybe even two forevers, but I’m back now and you can breathe a sigh of relief. I’ve been taking lots of fun little trips and spending what free time is left at the beach. And, in case you somehow missed it, we’ve had a little bit of a heatwave and I only have a wimpy little window A/C in my bedroom. No oven will be turned under those circumstances! Continue reading
Posted in Baking Jumbles
Tagged blueberries, blueberry, cinnamon, coffee cake, streusel
Leave a comment
Chocolate Pavlovas with Chocolate Mascarpone Mousse
It should come as no surprise to any of you that not only do I write a baking blog, but I read a ton of others. (After all, most of my recipes are adapted from or inspired by other blogs!) So, in reading through older posts of some of my favorite blogs, I came across something I had never heard of before. Pavlovas.
Have you heard of them? Well, I had to figure out what this was all about, so I went to a trusted source that is never wrong (haha), Wikipedia. The pavlova, as it turns out, is a meringue-based dessert named after the Russian ballet dancer Anna Pavlova, and it is typical to Australia and New Zealand.
I like merengue! And most people like chocolate! Sounds good to me!
A cool thing about this is that you can really alter it in any way you’d like. The meringue “dish” can be any size. I made mine about 1.5″ diameter, but you could make them as big as your imagination. Mine were finger food treats. You could make a “bowl” out of it, fill it with more mousse and fresh fruit and have a dessert course. Or, go even bigger and have it serve multiple people. You can also be creative in the form that the shell/dish takes. I piped out a circle, but you could use molds (or just dollops) and then scoop out the center before baking.
I should say that the original recipe made significantly more mousse and I was left with a ton that I will find some other use for. The mousse recipe below, therefore, is half of what was originally suggested. If you intend to create larger pavlovas (like I mentioned above, for a larger dessert plate), you might want to consider making more. For small individual pavlovas, this should be more than enough.
Chocolate Pavlovas with Chocolate Mascarpone Mousse
inspired by: Alpineberry

for meringue
3 large egg whites
1/2 c + 1 T granulated sugar
1/4 c powdered sugar
1/3 c cocoa powder
- Preheat oven to 200 degrees. Line two baking sheets with parchment or slipat and set aside.
- With a whisk attachment, mix egg whites in mixer on low until soft peaks form. Increase speed to high and gradually add granulated sugar, 1 Tablespoon at a time, until stiff peaks form. (Firm but moist.)
- Sift powdered sugar and cocoa into egg whites and gently fold together to incorporate.
- Using a pastry bag, pipe meringue into “dish” shapes (or use your own creative ideas).
- Bake for 2-3 hours, until meringues are dry and crisp. Cool and store in an airtight container for up to 3 days.
for Mascarpone Mousse
3/4 c heavy cream
grated zest of 1/2 lemon
4.5 oz of bittersweet (72%) chocolate, chopped
8 oz mascarpone
pinch nutmeg
1 T orange juice
- Put 1/4 c of heavy cream and lemon juice in a saucepan over medium heat. Once warm, add chocolate and whisk until smooth. Transfer to a bowl and let cool to room temperature.
- In a mixer on low, combine mascarpone, nutmeg, and remaining cream until mascarpone is loose (about 1 minute). Add orange juice and whip on medium until it forms soft peaks. Do not overbeat!
- Fold mascarpone mixture into chocolate mixture until well incorporated.
- Using pastry bag, pipe mascarpone mousse into meringue shells. (Or just spoon it in and make it pretty!)
")
serves: 25 (with my size shells)
calories: 100
Challah with Raisins
I started my previous post saying “I wish summer would get here already.” Well, I’ll be darned, ask and ye shall receive! Yeah! Memorial Day weekend was just as it should be – sunny and hot! The beach called my name! For those of you who don’t know, I am a beach bum, a sun worshipper, and summer lover! This is what I wait for the rest of the year!
sunscreen purchased – check
beach bag packed – check
season beach pass bought – check
sunglasses on – check
appropriate beach reading material – check
As you can see, I’m all set. I try all summer long to do what I can to keep up with the baking and blogging. In fact, my very first blog post was done in the midst of a heat wave. (Ohmygosh, we’re almost up to my 1-year blog birthday!) So, I will do my best with fruity and summery sweets again this year. But, I confess, this weekend was bake-free. So, this post is actually an oldie that I was hanging on to for just such an occasion.
This is a recipe for Challah which makes 2 loaves (unless, of course, you make monster loaves). What do you do with all that extra bread? Give it to a friend! Freeze it! Make french toast (my preferred option)! As with many bread recipes, this takes a fair amount of time waiting around. You need a minimum of 2 hours and 10 minutes if everything goes perfectly according to plan and the bread actually rises without taking its good old time. Good luck with that!
Enjoy the bread, but even more important – ENJOY THE SUMMER!
Challah with Raisins
source: Baking Bites

1 t sugar
1 c warm water, divided (110 degrees F)
1 T active dry yeast
1/2 c oil
1 T honey
2 large eggs
2/4 c sugar
2 t salt
3 3/4 c all-purpose flour (plus extra for kneading)
2/3 c raisins
1 egg white, beaten with 1 t water
-
In a large mixing bowl, dissolve sugar and yeast in 1/2 c warm water. Let stand 10 minutes until mixture is foamy.
-
Add oil, remaining water, honey, eggs, sugar, salt, and 2 cups of flour to the yeast mixture. Mix until dough is smooth. Gradually mix in remaining flour until dough comes together in a ball and no longer sticks to the sides of the bowl. (This can be done by hand or with a mixer using a dough hook on low speed.) Mix in raisins. Let dough rest for 10 minutes.
-
After this brief rest, mix again. If by hand, on a lightly floured surface knead for 8-10 minutes, incorporating additional flour as necessary to prevent dough from becoming sticky. If using a mixer, use a dough hook on low speed for 8-10 minutes. Dough should be elastic and slightly sticky when done.
-
Place dough into a lightly oiled bowl, cover with plastic wrap or a clean dish towel, and let rise until doubled. About 1 hour.
-
Transfer dough to a lightly floured surface and deflate. Cut dough into two equal halves (assuming you are making 2 loaves) and then each half into equal thirds. Roll each third as if you were playing with play-doh, creating a long rope. Starting in the middle, braid ropes together, pinch ends, and tuck ends underneath dough. (Starting in the middle creates a more even appearance.)
-
Preheat oven now, to 375 degrees
-
Place each loaf on a parchment-lined baking sheet, brush lightly with egg white, and let dough rise, 35-40 minutes, until almost doubled.
-
Remove plastic wrap and bake for 30 minutes or until deep golden brown. Cool on wire rack before slicing.
")
")
