
 Sometimes I bake something with no intention whatsoever of blogging it. It seems simple and not so special and just something I made for the heck of it. Fortunately, this has happened enough times that I now photograph most things I bake even if I wasn’t going to blog them, because after the fact I might change my mind. Continue reading
Grapefruit Pound Cake
Lemon Blueberry Triple Layer Cake
Last weekend family and friends gathered to celebrate my dad’s retirement. After 40 years of working (albeit one day per week for those of you who know him, haha), he is now on Easy Street.
The opportunity to feed a group other than my coworkers (or me, myself, and I) was there, so I decided to bake a cake for our family to enjoy. The recipe below has been adapted from one I found online – the jam and icing weren’t originally enough. You can make the jam ahead of time, and I recommend doing so in order to save time once you are ready to bake the cake itself.
Lemon Blueberry Triple Layer Cake
Adapted from Lick the Bowl Good

Blueberry Jam (can be made up to 5 days in advance):
4 ½ c blueberries, fresh or frozen
1 c + 2 T sugar
3 T freshly squeezed lemon juice
2 ¼ t grated lemon zest
- Puree the blueberries with any juices that have exuded in a blender. Pass the puree through a coarse strainer to remove the skins.
- In a medium saucepan, combine the blueberry puree with the sugar, lemon juice, and zest. Bring to a gentle boil over a medium heat, stirring often until the preserves have thickened and are reduced to 1 ½ cups.
- To check the proper thickness of the jam, place a small amount in the freezer until cold. Drag your finger through it, and if a path is made through the jam then it is ready. Cool before using.
Cake:
2 sticks (1 c) unsalted butter, room temperature
2 c sugar
2 t grated lemon zest
1½ t lemon extract
7 egg whites, room temperature
3 c cake flour
4 t baking powder
½ t salt
1¼ c milk
- Preheat the oven to 350 degrees F. Butter the bottom and sides of three 8 inch round cake pans. Line the bottom of each pan with a round of parchment or waxed paper and butter the paper.
- In a mixer, cream together the butter, sugar, lemon zest and lemon extract until light and fluffy. Gradually add the egg whites 2 or 3 at a time, beating well between additions and stopping occasionally to scrape down the sides of the bowl.
- In a medium bowl, sift together the flour, baking powder and salt. In 2 or 3 alternating additions, beginning and ending with the flour mixture, beat the dry ingredients and milk into the butter mixture. Beat on medium-high speed for about 1 minute.
- Scoop 1 cup of the batter into a small bowl. Divide the remaining equally among the 3 prepared pans, smoothing the tops with a spatula. Add 2 ½ T of the lemon blueberry jam to the reserved batter and blend well. Drizzle heaping teaspoons of this blueberry mixture over the batter in the pans. Use a skewer or knife to swirl the blueberry mixture into designs on top of and into the cake batter.
- Bake for about 25 minutes or until a toothpick comes out clean and the cake pulls away from the sides of the pan. Cool for 10 minutes and turn out onto a wire rack, peeling off the paper and leaving to cool completely.
Lemon Buttercream
1 ½ c sugar
¼ c + 2 T water
3 eggs
4 ½ sticks unsalted butter, room temperature
3 T freshly squeezed lemon juice
+/- 2 c blueberries for decorating, if desired
- In a small saucepan, combine the sugar and water over medium heat. Bring to a boil, stirring to dissolve the sugar. Continue to boil without stirring, occasionally washing down the sides of the pan with a wet pastry brush until the syrup reaches the soft-ball stage, 238 degrees F on a candy thermometer. Immediately remove from the heat.
- With an electric mixer on medium speed, beat the eggs briefly. Slowly add the hot syrup in a thin stream, pouring it down the sides of the bowl, carefully avoiding the beaters or the syrup may splatter. When all of the syrup has been added, raise the speed to medium-high and beat until the mixture is very fluffy and cooled to room temperature. This can take 15-20 minutes.
- Reduce the speed to medium-low and gradually add the softened butter 2 to 3 tablespoons at a time, beating well between additions. (The frosting may appear to break, but it will come back together like whipped butter.)
- Beat in the lemon juice.
To assemble the cake, place a layer on a cake stand or platter. If the top is uneven or rounded, even it out with a knife. With a piping bag, create a “wall” of icing around the top edge and spread half of the blueberry jam within that icing border. Place a second cake on top of the first and repeat with icing and jam. Finally place the third cake layer on top and frost the top and sides with the lemon buttercream icing. Decorate with fresh blueberries and serve.
Makes one 8 inch triple layered cake.


Serves: 8
calories: too many to fathom, just forget about it
Homemade Snickers Bars
I have a relatively quick and easy recipe for you today – Homemade Snickers Bars. While it may look like a lot of steps, each is quite painless and fast. In fact, every layer except the nougat layer is melted in the microwave (if you want) and the hardneing process in the fridge between each layer is about 5 minutes. You can have these done in under 30 minutes.
These are best eaten cool, because once they warm up the chocolate starts melting and peeling off, so store them in the fridge.
Homemade Snickers Bars

Bottom layer:
1 c milk chocolate chips
¼ c butterscotch chips
¼ c. creamy peanut butter
- Line a 9×13” pan with aluminum foil and spray with nonstick cooking spray. Melt together all ingredients in the microwave, stirring every 30 seconds until melted.
- Spread into a 9×13 pan and refrigerate to harden.
Nougat layer:
¼ c butter
1 c sugar
¼ c evaporated milk
1 ½ c marshmallow fluff
¼ c creamy peanut butter
1 t vanilla
1 ½ c salted peanuts, chopped
- Melt butter in saucepan over medium heat. Add sugar and milk, stirring constantly to dissolve the sugar. Bring to a boil and stir for 3 minutes; mixture will start to follow your spoon.
- Remove from stove and stir in marshmallow fluff, peanut butter and vanilla. Mix until smooth. Spread over first layer and immediately sprinkle peanuts over top.
- Again, refrigerate to harden.
Caramel layer:
1 (14 oz.) bag caramels
¼ c evaporated milk
- Unwrap and melt the caramels with the cream in the microwave, stirring every 30 seconds until melted. Carefully spread over nut and nougat layer and refrigerate to harden.
Top Layer:
1 c milk chocolate chips
¼ c butterscotch chips
¼ c peanut butter
- Melt together all ingredients in the microwave, stirring every 30 seconds until melted.
- Spread onto caramel layer and refrigerate to harden. Cut into small bars. Keep refrigerated.
Serves: about 32
Calories: about 190
Posted in Candy Jumbles
Tagged butterscotch, candy, caramel, chocolate, peanut butter, peanuts
Leave a comment
Strawberry Mousse
Finally! I know that summer is on its way when berries are plentiful at the supermarket and their prices are reasonable. I am looking forward to many delicious recipes using some of my favorite berries. Earlier this week I made a blueberry coffee cake that was, unfortunately, unworthy of a blog post. But, last night I prepared a Strawberry Mousse that is not only yummy, but healthy (ok, healthier than most desserts…good enough)!
I hope that you, too, enjoy the fruits of the season all summer long. You can be sure I’ll be sharing many fruit-based recipes this summer!
Strawberry Mousse
")
1 c finely chopped fresh strawberries
½ c sugar, divided
5 T water, divided
¾ t unflavored gelatin
dash of salt
2 large egg whites
¼ t vanilla extract
½ c heavy cream
- Combine chopped strawberries and 1 T sugar in a food processor or blender and toss gently. Let stand for 10 minutes and then process until smooth.
- In the bowl of an electric mixer, pour in 2 T of water and sprinkle with gelatin. Let stand for 5 minutes.
- After 5 minutes, add egg whites to the gelatin mixture and beat with a whisk attachment until foamy. Gradually add 1 T sugar, beating on high speed until soft peaks form.
- On the stovetop, combine 6 T sugar, 3 T water, and a dash of salt in a small saucepan. Bring to a boil over medium heat, stirring just until the sugar has dissolved. Without stirring, allow temperature to rise until a candy thermometer registers 240 degrees.
- Remove from heat and gradually pour the hot sugar syrup into the egg white mixture, beating until stiff peaks form. Beat in vanilla.
- In a separate small bowl, beat cream with a whisk attachment at high speed until stiff peaks form.
- Fold the egg white mixture into the whipped cream until combined. Then fold in the strawberry mixture.
- Spoon ½ c of the mixture into 6 dessert glasses and chill at least 2 hours or until set.

Serves: 6
Calories: 150
Cheesy Jalapeño Dip for Cinco de Mayo
Since I still haven’t finished my Peanut Butter Icebox Pie from earlier this week, I decided to make something less sweet for Cinco de Mayo.
Today, I bring to you a Cheesy Jalapeño Dip, great for tortilla chips, veggies, pita, or anything else that you deem dippable.
My parents are in town for the weekend so I will keep this blog short and sweet. We will be spending time at City Island in the Bronx where we will enjoy a lobster tail dinner on the water, and then Coney Island in Brooklyn where we will “enjoy” Nathan’s Hot Dogs! Two places that are worlds apart but both in New York City; what a great place to live!
Enjoy the Cinco de Mayo (or Derby Day, whichever you prefer) weekend! ¡Buen provecho!

Cheesy Jalapeño Dip
Ingredients
16 oz cream cheese, room temperature
1 c mayonnaise
8 pieces of bacon, cooked and chopped up
6 jalapeños, seeded and minced (or a 4 oz can diced jalapeños, drained)
2 cloves of garlic, minced
1/2 t cumin
1 1/2 c cheddar cheese, shredded
1 c panko breadcrumbs
1 c grated Parmesan cheese
4 T unsalted butter, melted
Instructions
- preheat oven to 375 degrees
- combine cream cheese, mayonnaise, bacon, jalapeños, garlic, cumin, and cheddar cheese in an electric mixer. Spoon into a casserole dish or 9×13 baking dish.
- In a separate bowl, combine panko breadcrumbs, Parmesan cheese, and melted butter, tossing until the mixture is evenly moistened. Sprinkle evenly over the cream cheese mixture.
- Bake for 25-30 minutes until the top is golden brown and bubbling. Serve warm with tortilla chips, pita, veggies, etc.
Posted in Bacon Jumbles, Cooking Jumbles
Tagged appetizer, bacon, cheese, dip, jalapeño, mexico
Leave a comment
Peanut Butter Icebox Pie
 First, a brief complaint. I hate when recipes call for “chocolate wafer” cookies. There are two kinds of chocolate wafer cookies and the recipe never says which, so I have to read through the recipe and try to deduce which it is talking about. This drives me mad. Several times I have just tossed a recipe because I couldn’t be bothered figuring out which type of chocolate wafer cookie they wanted. For today’s recipe I was able to figure it out, and it’s the Nabisco (round chocolate disc) version. Goya Maria cookies work equally well. Continue reading
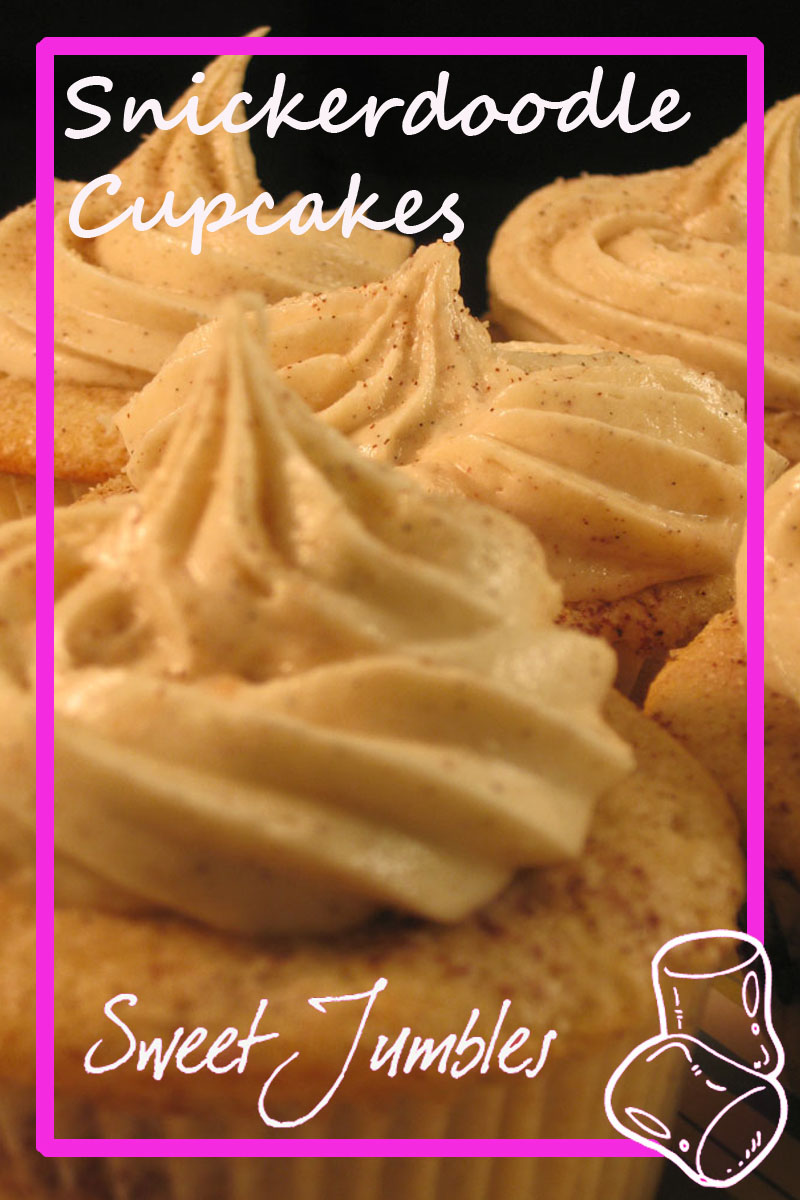
Snickerdoodle Cupcakes
Remember when a few weeks ago I said that I made two lemon meringue pies in order to taste test two recipes and see which one won? Well, I did it again. I had three Snickerdoodle Cupcake recipes sitting around and had been procrastinating for at least a year. So yesterday I finally sifted through the recipes and made a game plan. Fortunately, two of them were pretty much identical for the cake, so I only made two different cupcakes. I did, however, make three frostings. It was easier than I thought it would be, and now I get to throw away the two “loser” recipes (Yeah, I’m talking to you Martha Stewart!). Seriously, I love to throw things out. It is a weird quirk of mine.
The winning recipe has a great cinnamon cake and the icing is a cinnamon vanilla bean buttercream. I think they’ll be a hit!
Snickerdoodle Cupcakes
with Cinnamon Vanilla Bean Buttercream
")
for the cake:
3 c cake flour
1 T ground cinnamon
1 t baking powder
¾ t baking soda
½ t salt
1 ½ c (3 sticks) unsalted butter, room temperature
2 c granulated sugar
4 large eggs, room temperature
1 t vanilla extract
1 ¼ cups buttermilk
extra cinnamon sugar for dusting
- Preheat the oven to 350 degrees.
- Sift together the flour, cinnamon, baking powder, baking soda, and salt. Set aside.
- With mixer, combine the butter and sugar until fluffy, about 2-3 minutes on medium speed. Add the eggs, one at a time, beating well after each addition. Beat in the vanilla.
- Alternately add the flour mixture and buttermilk beginning and ending with the flour mixture.
- Fill each cupcake liner two-thirds full. Sprinkle some of the cinnamon sugar topping over the batter.
- Bake cupcakes for 20 minutes, or until the top springs back after lightly pressed. Allow cupcakes to cool in pan for 5 minutes then remove cupcakes and cool completely on wire rack before frosting.
for the frosting:
4 c powdered sugar
1 ½ c (3 sticks) unsalted butter, room temperature
1 ½ t vanilla extract
1 vanilla bean, seeds scraped
Pinch of salt
¼ t cinnamon
extra cinnamon sugar for dusting
- In the bowl of an electric mixer, beat butter until light and fluffy, about 3 minutes.
- Add vanilla extract, vanilla beans, salt, and cinnamon and beat until combined. Add confectioner’s sugar, a half cup at a time, beating until smooth and fluffy, about 5 minutes.
- Frost and dust with cinnamon sugar as desired.
")
serves: 24
calories: 400
calories: 400
Chocolate Peanut Butter Easter Eggs
This is, unfortunately, probably a very unoriginal post. So far this week I’ve seen at least 3 other blogs post Chocolate Peanut Butter Easter Eggs. But I had decided to make these before I saw those posts and my heart was set on them, so I’m not changing my plans. These Chocolate Peanut Butter Eggs are very easy to make and are a sure crowd pleaser (unless you are my mother who can’t stand the combination…weird-o).
Be warned, the recipe below makes 36 medium/large-sized eggs. I realized part way thorough that I should have cut everything in half. Then again, you can never have too many so maybe not. The recipe below calls for a semi sweet chocolate coating, but if you prefer a dark chocolate that would work equally well.
Hope you all have a joyous Easter!
Chocolate Peanut Butter Eggs
source: Whimsical Princess
")
4 c powdered sugar
1 ½ c creamy peanut butter
¼ c butter, room temperature
2-4 T milk
3 c semi sweet chocolate chips (or more, as needed)
1 T shortening
- In an electric mixer, combine the powdered sugar, peanut butter, and butter. Once combined, add the milk one tablespoon at a time until doughy, much like play-doh.
- Form the dough into ovals or egg shapes. Place on a cookie sheet and freeze for about an hour.
- In a double boiler or in the microwave, melt chocolate chips and shortening. If using a microwave, heat at 30 second intervals, stirring at each break.
- Dip each egg in melted chocolate and place on waxed paper until hardened. You can refrigerate to speed up the hardening process. (You can use a skewer to dip the egg in the chocolate. Slide skewer off immediately and cover hole before it hardens.) If you need additional chocolate (which I did), for each additional cup of chocolate chips add 1 teaspoon of shortening and melt as described above.
- Optionally, trim excess chocolate at base with a warm knife and/or decorate with royal icing or melted chocolate/candy pieces.
")
serves: 36 (medium-large eggs)
calories: 255
Meyer Lemon Meringue Pie and overindulging in NYC
For the past several weeks I have been eating very healthy. Well I always eat healthy, but I’ve been on a little bit of a kick. That is, until Wednesday.
For starters, it’s Girl Scout Cookie Season. Frankly, that should be all that I have to say. That should cover all of my bases and clarify any excuses I need to make.
But it doesn’t stop there. On Wednesday I was running errands in two neighborhoods which I rarely frequent. First I was on the Upper East Side of Manhattan. It dawned on me that a well-known cupcake shop called Sprinkles was nearby. Now, personally I am a Crumbs devotee – a fantastic cupcake shop with locations throughout the City – so going to Sprinkles made me feel a little bit like an infidel. Seeing as I am rarely on the Upper East Side, I decided to try four flavors in order to get a full sampling: Red Velvet (it was delicious), Cinnamon (extremely dense and dry, something went wrong), Brown Sugar Praline (again very dense, but great flavor), and Peanut Butter Chip (so awful that I had to throw it out…moment of silence please, because I’ve never before thrown out a cupcake…why the heck did that thing taste like coffee?). I can now say with full conviction and personal experience that Crumbs cupcakes are bigger and considerably better than Sprinkles, and there is no reason to go to Sprinkles again. As an aside, you know you have been living by a New York standard for far too long when $14 for four cupcakes seems perfectly reasonable.
Mediocre Sprinkles cupcakes:
Next, I had to head downtown to NoLIta and the Lower East Side to meet a friend for dinner. En route, however, I walked right past my beloved Rice to Riches (which I mentioned in a post last year). Again, because I am rarely in this area I jumped at the opportunity to make a special purchase of my favorite rice pudding. I even got the “diva” size (basically kiddie size) to show my self-control. I was again reminded that you know you have been living by a New York standard for far too long when $4.75 for 6 oz. of rice pudding seems, if not reasonable, at least not highway robbery.
The carnage:

So, off I go to dinner, with 4 cupcakes and 6 ounces of rice pudding in tow.
I enjoy my meal and merrily head home with a satisfied belly. But oh my gosh. Oh. My. Gosh. Mere days ago I heard about a new churro spot that opened up in New York; I “pinned” it on my Pinterest board and promptly filed it in the back of my mind without even taking note of where it was located. It’s called Churreria and it is on the same block as where I ate dinner. I didn’t realize this at all, so clearly the food gods had this all planned very carefully. Have I mentioned I’m never in this neighborhood? So it would really be foolish of me not to patronize the place like right now even though I just ate dinner. Right? These churros are Spanish style (specifically Catalan) – meaning you dip them in hot chocolate. Only their hot chocolate isn’t like our hot chocolate, oh no no no. It’s thick, almost like pudding. And you stick your warm fresh-from-the-oven (er, fryer?) churro into the hot chocolate and devour. Clearly it would not be good to purchase your churro and eat it a day or two, or even an hour or two, later. You basically need to eat it immediately. After ordering, I discovered that their “Churros for 1” menu item could in fact feed a family of four. So, logically, I ate it all. By myself. Immediately after eating dinner. And it was really good.
Terrible picture but trust me it was delicious:

Let me summarize. I have had been eating really healthy. I had been tempering my consumption of Girl Scout cookies. However, an evening of errands around New York resulted in the unplanned purchase of the following: 4 cupcakes, 6 oz. of rice pudding, and enough churros and hot chocolate to feed a family of four. And I’m not sharing.
As if those sweets weren’t enough, I found that my local supermarket had some Meyer Lemons in stock and I decided to try some Lemon Meringue Pie. I had two noticeably different recipes so I made both and did some taste testing. I tried two techniques, two different recipes, and pulled the best from both to (hopefully) create a top-notch lemon meringue pie.
This recipe is for Meyer Lemon Meringue Pie. Meyer Lemons are smaller and sweeter than regular lemons, and some find a hint of orange in their flavor. If you can’t find Meyer Lemons, you can go ahead and use regular lemons. Also, be sure your butter and eggs have all been brought to room temperature before starting.
There are two major ways to go about making a lemon meringue pie. Some people swear by the method whereby you make the lemon filling, let it cool completely, and then you put the meringue on top and bake. Other people prefer to put the meringue on a very hot lemon filling. The reason for the debate is that heat and moisture can both ruin a meringue if they come together in the wrong way. If you’re putting meringue on a hot lemon filling, heat is hitting the meringue from all angles and some think that makes for a better meringue. Let me simplify it for you: the technique of putting the meringue on a fully set room temperature pie is easier for me. However, the specifics of your oven, your climate (heat and humidity), and who knows what else can make all the difference. So it’s really a matter of personal preference. Additionally, you will see that cake/donut crumbs are an option between the lemon and meringue layers. Some claim that the bread will absorb any undesirable moisture that would otherwise cause the meringue to fail. I used ¼ donut – you don’t want a full heavy layer, just a scattering of crumbs. You’ll never notice them when eating.
If you opt to put the meringue on a hot lemon filling, you need to have the meringue ready immediately. In other words, do the recipe below in reverse: make the meringue first and preheat your oven before starting on the lemon filling. This is critical.
Now, off we go.
Meyer Lemon Meringue Pie
")
1 9-inch pie crust, pre-baked and cooled . Brush the crust with lightly beaten egg white during the last five minutes of baking to seal it.
For the lemon filling
1 c plus one T granulated sugar
2/3 c cold water
½ c cornstarch
¾ c Meyer lemon juice
2 t finely grated lemon zest
4 large egg yolks, room temperature
pinch kosher salt
1 ¼ cups boiling water
Cake crumbs/donut crumbs (optional)
- Without using heat, in a medium sauce pan combine all the ingredients for the filling except for the boiling water. Whisk until the mixture is thoroughly combined.
- Whisk in the boiling water and then place the sauce pan over medium-high heat. Bring the mixture to a boil stirring gently with a spatula or wooden spoon. Then reduce heat to medium-low and cook for up to one minute and no longer, continuing to stir gently.
- Immediately pour the filling into your prepared pie crust.
- If you are doing a hot filling meringue, immediately top with your pre-prepared meringue as described below and bake. If opting for a cold filling, allow the filling to cool completely (several hours) and then move on to the meringue recipe below.
For the Meringue
4 large fresh egg whites, room temperature
1 T of cornstarch or flour
1/4 c water
½ c sugar
1/2 t cream of tartar
- REMEMBER: if you will be doing a “hot meringue” (putting it on a just cooked lemon filling) this needs to be prepared ahead of time. If you are reading this and your lemon filling is already done, you should resort to the cool method, which means you put the meringue on the set and room-temperature lemon.
- Preheat your oven to 350°F and set a rack near the bottom of your oven.
- Combine the cornstarch (or flour) and water in a small saucepan over medium high heat, stirring constantly until it has thickened into a gel (about two minutes). Set aside.
- Using your electric mixer on medium speed, beat the egg whites and cream of tartar until foamy. Gradually add sugar in several increments.
- Beat on medium-high speed until stiff glossy peaks form. Add the cornstarch gel and beat to combine.
- If desired, sprinkle either your chilled or freshly poured piping hot pie with crumbs. Top with meringue, spreading it to the edges of the crust. It is very important that you “seal” the pie completely by pressing the meringue against the crust and that no lemon is visible. Fluff or smooth the meringue however you like.
- Bake the pie for 12-15 minutes until golden brown.
- For the chilled filling pie, allow the pie to stand for 15 minutes before cutting and serving. For the hot filling method, place the pie on a wire rack and allow to cool to room temperature before serving (several hours).
Serves: 10
Calories: 380 (incidentally, most calories are in the crust, so if you have a low cal crust, or want to fiddle with a no-crust custard type thing, have at it! The filling and meringue combo is only 216 calories per person.)
Posted in Baking Jumbles, Urban Jumbles
Tagged churros, crumbs, la churreria, lemon, lemon meringue, meringue, nyc, rice to riches, sprinkles
3 Comments
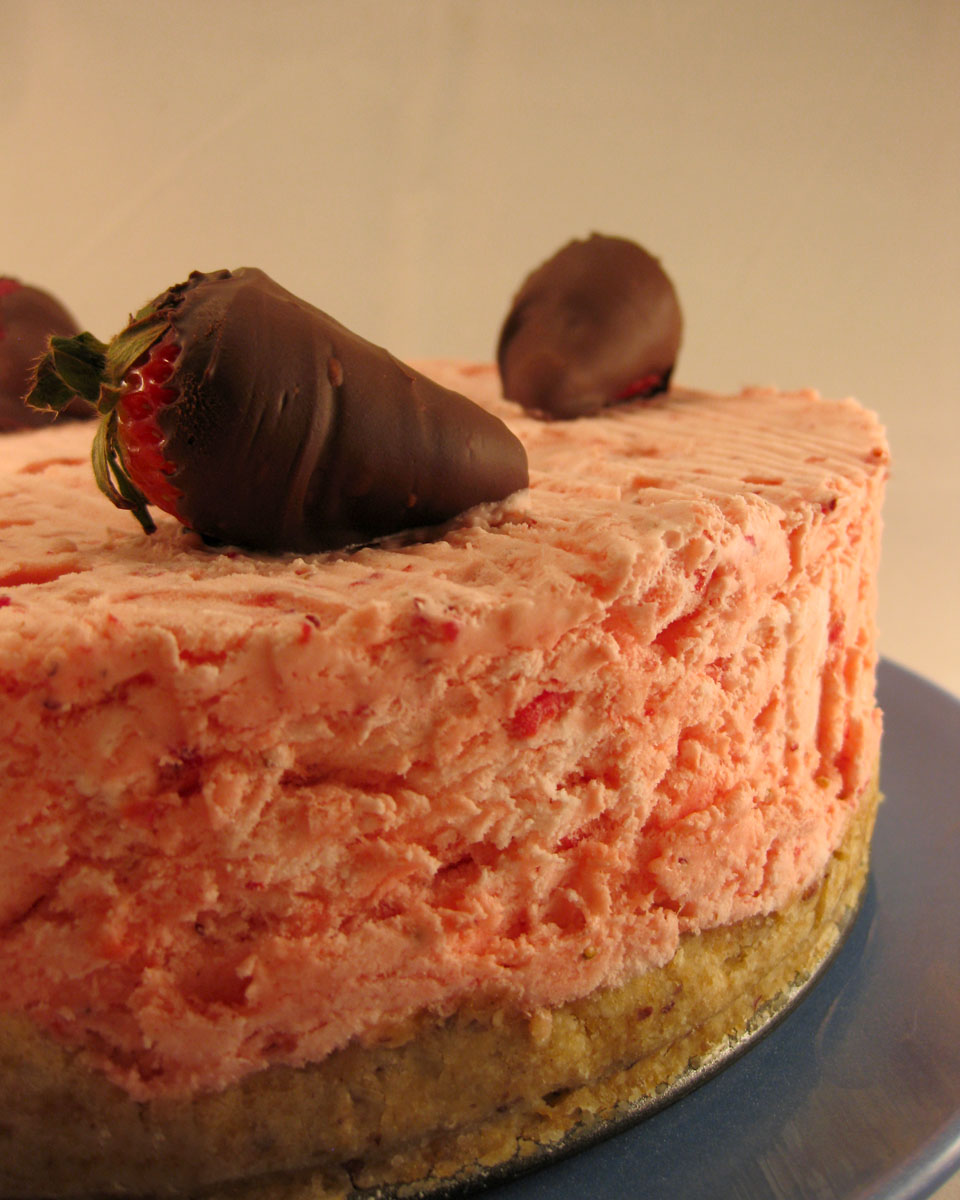
Strawberry Chantilly
After a beautiful and warm week, this Sunday was slightly cooler and overcast – the perfect day to stay home, do some housework, and of course bake. Earlier in the week I had stumbled upon a recipe for Chantilly pie, something I never heard of before. Evidently, chantilly is a light, frozen pie typically with a fruit and cream base. For the first time this season, my local supermarket had fresh strawberries on sale and I decided it would be the perfect opportunity to try the new chantilly recipe. It was great and something I will definitely keep in mind for warm summer days. I see no reason why you couldn’t substitute strawberries with any other favorite fresh berry of your choice. Enjoy!
Strawberry Chantilly
Adapted from Coleen’s Recipes
")
For the Crust:
1 c all purpose flour
¼ c brown sugar
½ c unsalted butter, cold
½ c chopped pecans
For the Filling:
2 egg whites
1 c granulated sugar
2 c fresh strawberries
1 t lemon juice
2 drops red food coloring, optional
1 c heavy whipping cream
- Preheat oven to 325.
- With a pastry cutter or two knives, cut the cold butter into the flour and sugar until crumbly. Stir in the chopped pecans.
- Press mixture into the bottom and halfway up the sides of a springform pan and bake at 325 for 28 minutes. Cool completely.
- Pulse the strawberries in a food processor until mostly pureed but some lumps remain.
- Place the pureed strawberries, egg whites, sugar, and lemon juice in a bowl of your electric stand mixer. Beat on high for ten minutes. (Use a large bowl, it expands a lot.) Add food coloring, if desired, and mix for a few more seconds until the color is fully incorporated.
- In a separate bowl, beat the heavy whipping cream into stiff peaks. Gently fold the whipped cream into the strawberry mixture.
- Pour the filling into the baked and cooled crust. Cover well and freeze for at least 6 hours.
- Slice with a hot knife and serve with additional strawberries, if desired.
")
Serves: 10
Calories: 442
