Royal Icing’s many uses

Sweet Jumbles has been very busy on the marshmallow front, coming up with creations for everything from the Superbowl to the Oscars to Valentine’s Day.  As a result, time spent baking has been limited.  I kid you not, I have had a particular bread recipe hanging on my fridge for 2 weeks now just waiting for me to bake it!  Maybe this weekend….

In the meantime, I realized it had been some time since my last post, so I wanted to touch base with all of my dedicated readers.

This post is less of a recipe and more of a secret tip with regard to Royal Icing.  If you aren’t familiar with Royal Icing, it’s that really beautiful icing that hardens on cookies.  Bakers use it to do very intricate pieces of what can only be described as art.  But, even the novice can make some pretty good looking treats.  In the past, I’ve included them on this blog when I made baby shower themed cookies and fireworks cookies for the Fourth of July.  Other people go more bananas, such as this Honeycomb Sugar Cookie, which by all accounts is beautiful but 6 cookies for $108 seems a little bit WHO THE HECK ARE YOU SELLING TO?! crazy.

So, let’s imagine you decorated some normal (not $108) cookies just for the fun of it and you have leftovers.  I’m here to help.

You can go back to the Fireworks blog post for the Royal Icing recipe, but the truth is any royal icing recipe is about the same and it’s easy as 1-2-3.  The trick is learning how thick to make the icing and that is all a matter of getting your hands sticky and figuring it out.

Now, as for that leftover icing…. Maybe you always know exactly how much to make and you don’t have leftovers.  If so, good for you but I inevitably have leftovers.  Sometimes a lot.  Until recently, I threw that stuff away…but not anymore!

There are (at least) two really cool things you can do with those leftovers.  For both, you need to get out a big ol’ cookie sheet and line it with waxed paper/parchment paper/slipat.  Ready?

Now, item #1 is cupcake toppers.  You can make fun designs or shapes with your leftover royal icing and down the road plop them on top of your cupcakes for decoration.  You can make whatever you want, including seasonal shapes (hearts, for example).  Let these sit for 24 hours before touching them.  If you want a dual layer – that is, a background and a raised foreground – you need to wait at least a few hours and preferably more before doing the top layer.  Store in an airtight container and they will last until the apocalypse.  (Maybe not but I’ve had mine for a few months and they’re still good.)

royal icing embellishments

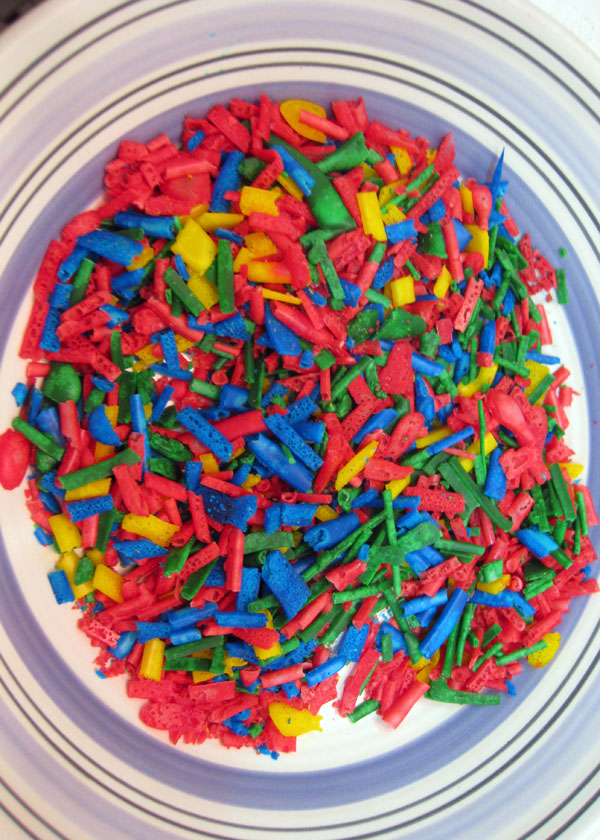
Item #2 is jimmies (or, depending on where you are from in the country, “sprinkles”).  You know, the little sugary things you throw on top of an ice cream sundae (or cupcake, or cookie…).  To make these, pipe long, thin lines of royal icing on your prepared surface side by side, in relatively straight lines.  Wait 24 hours.  I’m not kidding.  Don’t wait 12, you’ll regret it.  Then, chop them into little segments just like the jimmies you are used to buying at the store…or longer, or shorter, whatever you want.  Again, store until the apocalypse.

jimmies2

Now your royal icing leftovers aren’t wasted and you have sundae toppings and cupcake toppings to impress your friends!  Yum yum!

jimmies1

Posted in Baking Jumbles, Candy Jumbles, Slutty Jumbles | Tagged , , , , , | Leave a comment

Craisin Nests

It’s been a week of relative relaxation for Sweet Jumbles.

On the marshmallow front, after a whirlwind month of December fulfilling Christmas and New Year’s Eve orders, January is much quieter.  This lull is proving to be a great opportunity to try new recipes and prepare for Valentine’s Day, which will be here before you know it.

Sweet Jumbles did have the honor of being mentioned (and pictured) on The Flair Exchange, a blog featuring really unique and classy party decor.  Check them out!

In keeping with the “low maintenance” mood, this week I made Craisin Nests – a super easy and foolproof recipe.  (Plus, I love cranberries….)  There is also a lot of room for adjustment in this recipe.  You can use any flavor of Craisin (I used the original), and for the granola I happened to find Archer Farms Blueberry Granola, which sounded like a good pairing with Craisins.  The choices are up to you!

Craisin Nests
Adapted from Ocean Spray

Craisin Nests

¼ c honey
¼ c heavy cream
12 oz white chocolate baking chips
4 c chow mein noodles
1 c Craisins (any flavor)
1 c granola cereal
½ c slivered almonds (optional)

  • Line 2 large baking sheets with waxed paper.  Set aside.
  • Combine honey and heavy cream in a medium saucepan.  Cook over medium-low heat until bubbly.  Add chips and continue to cook, stirring regularly until chips are melted.
  • Combine remaining ingredients in a large bowl.  Pour cream mixture over dry mixture and stir until evenly coated.
  • Drop heaping tablespoonfuls onto waxed paper.  Let stand until set.
  • Store loosely covered.

Serves: 30 cookies
Calories: 128 (varies considerably based on your granola choice)

Posted in Baking Jumbles | Tagged , , , , , | 2 Comments

Cranberry Layered Cheesecake

Merry Christmas!  I hope you all enjoyed the hoilday and are now gearing up for the new year.  The retail end of Sweet Jumbles had a very busy month, selling many Artisan Marshmallows on Etsy for Christmas and New Year’s.  We’ve gotten rave reviews, and if you haven’t tried them yet, head on over to the website and take a peek.  Gingerbread was the seasonal favorite.

This is my 100th post on Sweet Jumbles.  I hope you’ve enjoyed all of them so far, and perhaps even taken some recipes to try yourself.

I served the recipe below at a family Christmas dinner.  It’s obviously too late for you to do that this year, but if you need something to serve on New Year’s Eve, or any wintertime gathering for that matter, this would be a crowd pleaser.

Cranberry Layered Cheesecake
Adapted from: One Perfect Bite

Cranberry Cheesecake(1)
Crust

½ c dried cranberries (such as Craisins)
2 c cake flour
½ c ground almonds
¼ c powdered sugar
¼ t salt
¼ t almond extract
½ c cold butter, cubed

Cranberry Layer
1 c + 2 T sugar
3 T cornstarch
1/4 c + 2 T cranberry juice
3 cups fresh or frozen cranberries

Cream Cheese Layer
4 packages (8 oz each) cream cheese, softened
1 ½ c sugar
1 t vanilla extract
4 eggs, lightly beaten

Sour Cream Topping
2 c sour cream
¼ c sugar
2 t vanilla extract

Whipped Cream Topping (optional)
1 c heavy whipping cream
1 T sugar
¼ t almond extract

  • In a food processor, finely chop dried cranberries. Add flour, almonds, powdered sugar, salt, and almond extract; process until blended. Add butter; pulse just until crumbly.
  • Press onto the bottom and 1.5” up the sides of a greased 10″ springform pan. Bake at 350° for 15 minutes.
  • Prepare Cranberry layer.  In a small saucepan, combine sugar and cornstarch; stir in cranberry juice until smooth. Add berries. Cook and stir until thickened and bubbly. Set aside.
  • In a large bowl, beat cream cheese, vanilla and sugar until smooth. Add eggs; beat just until combined. Pour half of the batter into the crust. Carefully spread half of the berry mixture over batter; top with remaining batter.
  • Bake for 45 minutes. Reduce heat to 250°. Bake 25-30 minutes longer or until center is almost set. Combine sour cream, sugar and vanilla; spread over top. Bake 25-30 minutes or until set. Cool on a wire rack for 10 minutes. Run a knife around edge of pan to loosen; cool 1 hour longer. Spread remaining berry mixture over the top. Refrigerate overnight.
  • Optional: Beat cream with sugar and almond extract until stiff peaks form. Pipe around top edge of cheesecake.

Cranberry Cheesecake(2)

Serves: 16
Calories: 490

Posted in Baking Jumbles | Tagged , , , | 1 Comment

Peanut Brittle

Last time I posted, I announced the Grand Opening of the Sweet Jumbles online Etsy store.  Here, I sell artisan marshmallows in an array of interesting flavors.  I’ve done a fair amount of business in the past 2 weeks, but it has not been without challenges.  The day that the first order came in, my KitchenAid stand mixer died.  DIED!  Fortunately, I have a back-up hand mixer.  Guess what – the next day, the hand mixer DIED!  Talk about bad luck.

A friend and coworker came to the rescue and lent me his KitchenAid, so I am now running the business with that machine while mine is being assessed at the KitchenAid factory.  Mine was only 2 years old, so this really irritates me.

If you haven’t already checked out the new Etsy site or Facebook page, please take a moment to do so.  Those two pages, along with this blog, will all work hand-in-hand.  The Facebook page will periodically list savings codes for the Etsy site, too!

In the meantime, the only thing besides marshmallows that I’ve found the time to make has been Peanut Brittle.  This is a super easy recipe that can be accomplished with only a small amount of time or effort.  Also, it’s a great product to ship to far-away friends at Christmastime, which is exactly what I did!!!

Peanut Brittle
Source: Brown Eyed Baker

peanut brittle(1)

2 c granulated sugar
1 c water
½ c light corn syrup
½ t kosher salt
2 T unsalted butter
½ t baking soda
3 c salted dry-roasted peanuts (about 1 lb)

  • Line a rimmed cookie sheet with parchment paper and spray with cooking spray.  Set aside.
  • In a medium saucepan, combine sugar, water, corn syrup, and salt.   Bring to a rapid boil over medium-high heat and simmer until deep and golden – about 20-25 minutes.  Remove from heat.  Stir in butter, baking soda, and peanuts.  This will likely make the mixture foam.  Stir until smooth.
  • Pour peanut mixture onto baking sheet and spread with a lightly greased spatula.  It will not cover the whole baking sheet, don’t worry about it being imperfect.
  • Cool until firm – about 15 minutes.  Break into pieces.
  • Store in an airtight container at room temperature for up to 3 weeks.

peanut brittle(2)

Makes: about 1.5 lb

Posted in Baking Jumbles, Candy Jumbles | Tagged , , , | Leave a comment

Big News from Sweet Jumbles

Big News!

Sweet Jumbles is expanding.

First, Sweet Jumbles now has an etsy website.  Here, you can purchase gourmet artisanal marshmallows.  Some flavors are standards, and some are seasonal that will be rotated accordingly throughout the year.  Marshmallows are large (about 1.25” cube, though all are a bit different due to the fact that we hand-make and hand-cut them and different flavors have slightly different densities) and bursting with flavor; these marshmallows are appropriate for snacking, toasting, and even adding to your hot chocolate.

With the holidays upon us, many of our current marshmallows feature winter flavors, such as Gingerbread, Maple, Peppermint, and Apple Cider.  More will be added this weekend, so check back frequently.

Our second new feature is a Facebook page!  Here you can see any important news and updates regarding both the baking blog and the etsy inventory.  Please “like” us; if you “like” the page, you will occasionally get discount codes for the etsy store, too!  Score!

Both the etsy link and Facebook link should appear on the right-hand column of this blog.  Please click both and explore these new ventures!

Posted in Uncategorized | Tagged , , | Leave a comment

Prosciutto & Provolone Breadsticks

This year my uncle made delicious breadsticks for our Thanksgiving dinner.  These breadsticks are stuffed with prosciutto and provolone cheese.  Knowing that I had leftovers of these very ingredients at home, I quickly “borrowed” the recipe.  I also had Pancetta and Romano cheese at home, so I made half of my batch with Prosciutto/Provolone and the other half Pancetta/Romano.  Both were delicious, although I personally prefer the Prosciutto for the extra bite that it seems to have.  These are really easy to make and not a bad choice if you are looking to venture into bread-making.

Prosciutto & Provolone Breadsticks
Source: “What You Knead” by Mary Ann Esposito

Prosciutto Breadsticks2
1 pkg dry yeast
1 ¾ c warm (110* F) water
1 T olive oil
4-4 ½ c all purpose flour
2 t table salt
¼ lb prosciutto
6 oz Provolone

  • Pour the yeast into ½ cup of water to bloom.  The yeast is ready to use ready when it bubbles or foams on the surface.  If this doesn’t happen within about ten minutes, most likely the water was too hot or the yeast was expired.  Try again. 
  • Bread can be made by hand or with your stand mixer.  If using an electric mixer with bread hook attachment, combine the flour and salt in the mixing bowl.  Add water/yeast as well as the rest of the warm water and mix.  If kneading by hand, combine the flour and salt on the counter, creating a “volcano” for the water/yeast and remaining water to be gradually incorporated. With either method, you want slightly sticky dough, but you don’t want it sticking to your fingers. Just add more flour if it gets too sticky.
  • Roll the dough into a ball, put it into a bowl coated with the olive oil, and cover with a dish towel for at least an hour until it doubles in size.
  • Once risen, mash the dough down and then split the dough in half. Roll out a disc like a pizza, 14 inches wide. Evenly cover with half of the prosciutto and provolone (more or less). Roll the dough up like a jelly roll and slice into 1-inch pieces. Roll each piece out into a 10-inch stick about the thickness of your finger. If the filling starts to fall out, just stick it back in.
  • Place on an oiled baking sheet or stone, and brush on some beaten egg.
  • Cook at 375*F for 20-25 minutes.  Repeat with the other half of the dough. 

Prosciutto Breadsticks1

Serves: 16-20
Calories: 140

Posted in Bread Jumbles | Leave a comment

Maple Oat Scones with Cinnamon Glaze

I trust that everyone sufficiently stuffed their faces this year on Thanksgiving and enjoyed the feast.  Now Christmas is practically upon us!  Can you believe it?

Recently I made some fresh scones for breakfast.  I’m not sure why I don’t do this more often; scones really are one of the more simple things to bake and really not very time consuming.   You can easily make scones when you wake up on the weekend and have them in your mouth within 45 minutes.  This particular recipe below is well-suited for fall.  I used the “real-deal” maple syrup that I purchased in Vermont this past summer.  I suggest you use maple syrup (not pancake syrup), but if you do go the “pancake syrup” route, drop me a comment and let me know how they turned out – I’d be curious.

Maple Oat Scones
source: Baking Bites

1 ½ c all purpose flour
¾ c quick cooking oats
2 T sugar
1 ½ t baking powder
¼ t salt
1/3 c butter, cold
¼ c pure maple syrup
½ c buttermilk
½ t vanilla extract
cinnamon glaze (recipe below)

  • Preheat oven to 400 degrees. Line baking sheet with parchment paper.
  • In a large bowl whisk together flour, oats, sugar, baking powder, and salt. Cut in butter with a pastry blender or two knives, making sure no pieces larger than a big pea remain.
  • In a medium bowl whisk together maple syrup, buttermilk and vanilla. Pour into flour mixture and stir until the dough comes together.
  • Divide dough into 6 pieces (balls, wedges, squares, whatever you want) and place each on prepared baking sheet. Flatten gently.
  • Bake for 16-20 minutes, until scones are golden brown.
  • Transfer scones to a wire rack and allow to cool slightly before drizzling with glaze.

Cinnamon Glaze

1 c confectioners sugar
2-3 T milk
1/2 t ground cinnamon

  • In a small bowl, whisk together confectioners sugar, 2 Tablespoons of milk and cinnamon until smooth. Add more milk if necessary in order to smooth glaze and bring it to a pourable consistency.
  • Drizzle over scones.

Serves: 6
Calories:  350

Posted in Baking Jumbles | Tagged , , , | Leave a comment

Pumpkin Swirl Brownies

20231123_084932I can’t believe Thanksgiving is upon us.  It snuck up on me for two reasons.  First, Hurricane Sandy threw everything off.  Because of her, we didn’t even have Halloween.  Halloween is like a prelude to Thanksgiving – a warning that Thanksgiving will be here soon.  But, that holiday was canceled and I was out of work for 2 weeks because our office flooded.  So, the end of October and beginning of November basically didn’t happen.  Second, Thanksgiving is weirdly early this year.  Last week my sister asked me what I was baking for Thanksgiving dessert, and I was all like, “who knows, I’ll figure it out later.”  She pointed out that Thanksgiving was a week away.  Hm.  Who knew? Continue reading

Posted in Baking Jumbles | Tagged , , , | Leave a comment

Hurricane Sandy & Day of the Dead

I was not able to bake my intended Halloween treat, thanks to Hurricane Sandy.  I am here in the NYC/NJ area and the storm packed quite a punch.  I got power back in the wee hours of Wednesday, however my office and many (if not most) of my neighbors remain in the dark.

Because of these power outages, I have been unable to return to work and have been suffering with a  case of cabin fever.  I decided, therefore, to lend a hand in the relief efforts just a mile away in Hoboken, NJ.  You may have seen images from Hoboken on the news because a large swath of the City remains underwater.

This morning I walked into Hoboken on streets that as recently as yesterday were still under a few feet of water (at least that is what photos tell me).  I spent the day handing out meals to 1,500 Hoboken residents who are still living without power.  The National Guard was in town rescuing people from flooded areas (which I was not able to see or approach), Duracell came with a “charging truck” for people to charge up their cell phones and the line was well over 50 people long all day, the few gas stations that were open were not accepting vehicles but had lines of people – again 50 people long – holding jugs for fuel for generators, and volunteers of all sorts converged on City Hall where they were assigned missions as needed.  It was a loooong day.  And I’ll be back there tomorrow doing it all over again.

That being said, I trust that you can excuse my lack of a Halloween post.  Below is a photo of some brightly colored Day of the Dead cookies that I decorated on Monday (before the storm hit, before we lost power).  Not only did these cookies keep me entertained for a while while I decorated them, but they have been a reliable form of sustenance during those hours without power!

For those of you who may have also been affected by Hurricane Sandy, I wish you well and and hope that you and yours are safe and dry.

Posted in Bacon Jumbles | Leave a comment

Mexican Hot Chocolate Cookies

Fall baking is here!  I have attacked my first truly fall-inspired recipe.  I know Halloween is fast approaching, however for some reason this year I feel more inspired by Day of the Dead (November 1) than Halloween.

For those unfamiliar, Day of the Dead (or Día de los Muertos) is a holiday, most notably celebrated in Mexico, that remembers those friends and family who have died.  Despite what some may see as a morbid day, the celebrations and remembrances have beautiful and bright colors, intricately decorated sugar skulls and masks, lots of marigolds, and tons of food.  Day of the Dead is not a day of sadness or mourning, but of happy memories.  Offerings, gifts, and tributes are left at the graves of those who have died or at small altars in private homes.  It’s always fun for me to learn about the traditions of other cultures and Day of the Dead is no exception – the festivities as well as the willingness to regard death as more than a sad occasion are both very interesting.

In this vein, I made Mexican Hot Chocolate Cookies.  Mexican chocolate is traditionally spiced with cinnamon and pepper, and that is no exception in this recipe.  The flavors are subtle but you can tell there is something more than just chocolate.  Enjoy these cookies as a flavorful nod to the Day of the Dead!

Mexican Hot Chocolate Cookies
source: The Busty Baker

2 ¼ c all purpose flour
½ c unsweetened cocoa powder
2 t cream of tartar
1 t baking soda
½ t coarse salt
2 t ground cinnamon, divided
½ t ground chipotle chile
1 c (2 sticks) unsalted butter, room temperature
1 ¾ c sugar, divided
2 large eggs
1 t vanilla extract

  • Preheat oven to 400 F. Line two standard baking sheets with parchment paper or silicone baking mats.
  • In a medium bowl sift together flour, cocoa powder, cream of tartar, baking soda, salt, 1 teaspoon cinnamon, and ¼ teaspoon ground chipotle chile.
  • In the bowl of an electric mixer, beat butter and 1 ½ cups sugar on medium speed until fluffy, about 3 to 4 minutes. Add eggs, one at a time, scraping down the sides of the bowl as needed. Add vanilla and combine. Reduce speed to low and add flour mixture, beat to combine.
  • In a small bowl, combine remaining ¼ cup sugar, 1 teaspoon cinnamon, and ¼ teaspoon ground chipotle.
  • Form dough into balls and roll in cinnamon sugar mixture to coat. Place on prepared baking sheets, spacing 3 inches apart. Bake until cookies begin to crack, about 10-12 minutes. Let cookies cool on sheets for 5 minutes before transferring cookies to wire racks to cool completely.

Makes about 40 cookies
Calories: 100 per cookie

Posted in Baking Jumbles | Tagged , , , , | 1 Comment