
 Berry season is upon us! I recently purchased a bunch of blackberries and have since been trying different recipes with them (some better than others). The one which “took the cake” – haha – was the Blackberry Chocolate Cheesecake.
Continue reading
Blackberry Chocolate Cheesecake
Nutella Peanut Butter Chip Cookies
 Last weekend I was preparing a very special care package for a good friend in a far-away land. My friend claims not to need anything, but baked goods are always appreciated and it gives me a way to bake a batch of cookies and only eat a few myself before packing the rest up and sending the calories to someone else. Continue reading
Posted in Baking Jumbles
Tagged care package, chocolate, cocoa, cookies, nutella, peanut butter, peanut butter chips, shipping
2 Comments
Rhubarb Muffins
 Summer is here! Yippieeee! I spent the last two days at the beach and am all the happier (and slightly redder) for it.
I know I haven’t shared a recipe in some time. I spent two weeks of May in Croatia and Bosnia on a much-deserved vacation. Now I’m back home and back in the kitchen. Continue reading
Posted in Baking Jumbles
Tagged buttermilk, cinnamon, freeze buttermilk, frozen buttermilk, muffins, rhubarb
1 Comment
Cheese Crackers
 Recently I tried something new that I had never baked before – crackers! I had found inspiration for this recipe online and made some minor modifications. The result was a cracker that was just like a Ritz! While I used a cheddar blend, it would be fun to try other cheeses to see how they work in this recipe. I would imagine that almost any “shredable” cheese would work nicely, and I’d love to hear what experiments any of you take on with other cheeses. Continue reading
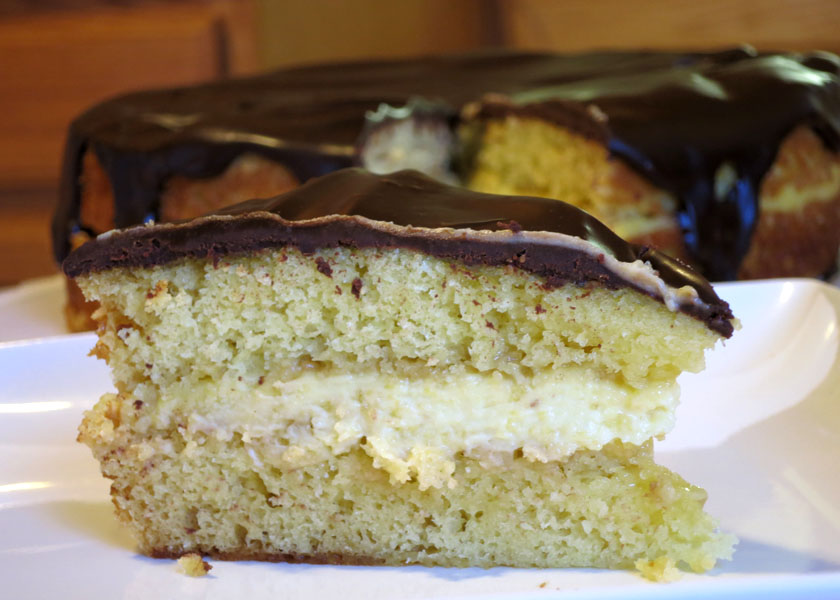
Boston Cream Pie
…no explanation necessary.

Boston Cream Pie
slightly adapted from Cook’s Illustrated
Pastry Cream
2 c half-and-half
6 large egg yolks
½ c sugar
pinch table salt
¼ c all-purpose flour
4 T cold unsalted butter, cut into four pieces
1 ½ t vanilla extract
Cake
1 ½ c all-purpose flour
1 ½ t baking powder
¾ t table salt
¾ c milk
6 T unsalted butter
1 ½ t vanilla extract
3 large eggs
1 ½ c sugar
Glaze
½ c heavy cream
2 T light corn syrup
4 oz bittersweet chocolate, chopped fine
- For the Pastry Cream: Heat half-and-half in medium saucepan over medium heat until just simmering. Meanwhile, whisk yolks, sugar, and salt in medium bowl until smooth. Add flour to yolk mixture and whisk until incorporated.
- Remove half-and-half from heat and, whisking constantly, slowly add ½ cup of the half-and-half to the yolk mixture to temper. Whisking constantly, return tempered yolk mixture to half-and-half in saucepan.
- Return saucepan to medium heat and cook, whisking constantly, until mixture thickens slightly, about 1 minute. Reduce heat to medium-low and continue to simmer, whisking constantly, 8 minutes. You will almost certainly see curdled egg yolk. Don’t sweat it – this will be strained out.
- Increase heat to medium and cook, whisking vigorously, until bubbles burst on surface, about 1 minute. Remove saucepan from heat; whisk in butter and vanilla until butter is melted and incorporated. Strain pastry cream through fine-mesh strainer set over medium bowl to eliminate the curdles. Press plastic wrap directly on surface and refrigerate until set, at least 2 hours and up to 24 hours.
- For the Cake: Adjust oven rack to middle position and heat oven to 325 degrees. Lightly grease two 9-inch round cake pans with nonstick cooking spray and line with parchment. Whisk flour, baking powder, and salt together in medium bowl.
- Heat milk and butter in small saucepan over low heat until butter is melted. Remove from heat, add vanilla, and cover to keep warm.
- In stand mixer fitted with whisk attachment, whip eggs and sugar at high speed until light and airy, about 5 minutes. Remove mixer bowl from stand, add hot milk mixture, and whisk by hand until incorporated. Add dry ingredients and whisk until incorporated.
- Divide batter evenly between prepared pans. Bake until tops are light brown and toothpick inserted in center of cakes comes out clean, 20 to 22 minutes.
- Transfer cakes to wire rack and cool completely in pan, about 2 hours. Run small knife around edge of pans, then invert cakes onto wire rack. Carefully remove parchment, then reinvert cakes.
- To Assemble: Place one cake round on large plate. Whisk pastry cream briefly (you may need to let it warm up just a bit first – if so, just set it on the counter for 10 minutes), then spoon onto center of cake. Using an offset spatula, spread evenly to cake edge. Place second layer on pastry cream, bottom side up, making sure layers line up properly. Press lightly on top of cake to level. Refrigerate cake while preparing glaze.
- For the Glaze: Bring cream and corn syrup to simmer in small saucepan over medium heat. Remove from heat and add chocolate. Whisk gently just for a few seconds to cover the chocolate. Let stand for 5 minutes, then whisk thoroughly until smooth.
- Pour glaze onto center of cake. Use offset spatula to spread glaze to edge of cake, letting excess drip decoratively down sides. Chill finished cake 3 hours before slicing. Cake may be made up to 24 hours before serving.
serves: 12
calories: 470
Midnight Sin Chocolate Cake
 Last week my office underwent a big change when one of my coworkers retired. She was one of the more senior level people in the office and had always been my go-to human encyclopedia when I needed help on a project. To send her off well, a big party was thrown and many people came to express their gratitude for her help over the years. Continue reading
Povitica
This past week I decided to venture back into bread making for an afternoon. I enjoy baking bread, and while I still find it occasionally challenging, I sure do love the outcome when it works. The trick for me is getting the bread to rise, and this is typically a temperature issue. I find that putting a warm heating pad on top of the bowl of rising bread helps.
The recipe that I have included below is an Eastern European bread that has many, many varieties. Everyone from an Eastern European country will likely argue that their grandmother’s version is “correct,” but so far as I can tell, the “right” varieties are endless.
Consistent among all recipes is that the bread is rolled out very thin. Because pie crusts still frustrate me, this initially worried me because the instructions are to roll the dough out so thin that you can read through it! However, I was pleasantly surprised to find this particular dough easy to work with.
The next part is selecting your filling. A very popular filling choice is poppy seeds. 3 cups of poppy seeds to be specific. WHAT? 3 CUPS of POPPY SEEDS? My poppy seeds are sold in 1.25 oz jars, so that’s like…I don’t know, a LOT of jars. Plus, I’m pretty sure that quantity of poppy seeds would certainly make me fail a drug test. Not that I’m taking any drug tests, but I think you know what I’m talking about.

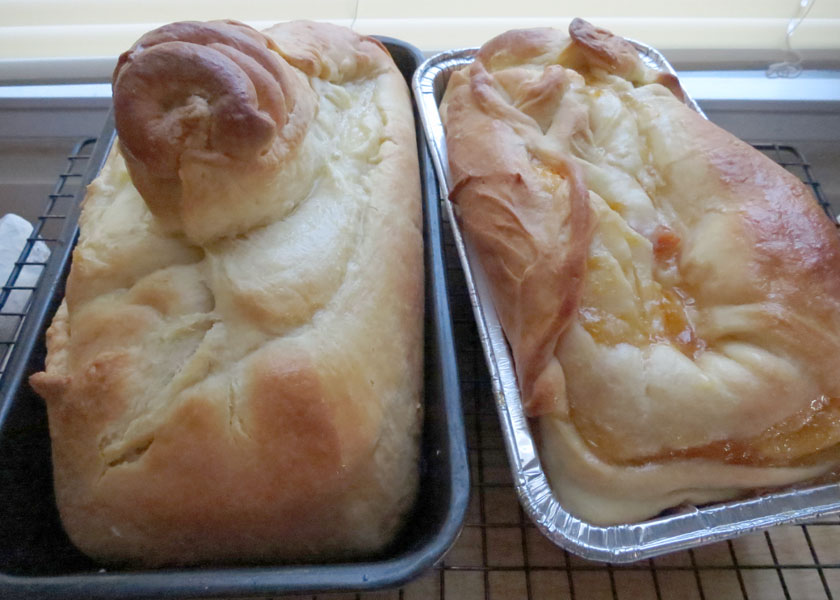
With further research, I discovered that walnuts (often with honey) are the most traditional filling for povitica. Other favorite options are cocoa, jam, raisins, honey, pecans, and cinnamon. Because I had both orange marmalade and apricot preserves in my fridge waiting for some special use, I chose to make one loaf of each. As you can see in my photos, the result is a swirled filling between very thin layers of bread. If you use a darker filling, the swirls will be even prominent.
My coworker deemed this my best baking project yet. Granted, she says that about 2-3 times per year, so take that for what it’s worth. I will add to that, however, that 6 coworkers ate 2 loaves of bread in under 4 hours. Yes, that is a testament to gluttony. Nevertheless, I think you will really enjoy this bread – it’s easier to make than it sounds, there are infinite flavors as you imagine new fillings, and it’s just delicious! The recipe below makes 2 loaves, so try 2 flavors!
Povitica

To Activate the Yeast:
1 t sugar
½ t bread flour or all-purpose flour
¼ c warm water
1 T Dry Yeast
Dough:
1 c milk + ½ c for brushing on top
6 T sugar + 2 T sugar for brushing on top
1 ½ t salt
2 large eggs, lightly beaten
¼ c unsalted butter, melted and cooled
4 c bread flour or all-purpose flour, measure first then sift, divided
filling:
jam/preserves of your choice
To Activate Yeast:
- In a small bowl, stir 1 teaspoon sugar, ½ teaspoon bread flour, and 1 tablespoon yeast into ¼ cup warm water and cover with plastic wrap. Allow to stand for 5 minutes
To Make the Dough:
- In a medium saucepan, heat the milk up to just below boiling, stirring constantly so that a film does not form on the top of the milk. Allow to cool slightly.
- In a large bowl, mix the scalded milk, sugar, and the salt until combined.
- Add the beaten eggs, yeast mixture, melted & slightly cooled butter, and 1 cup of bread flour. Blend thoroughly and slowly add remaining flour, mixing well until the dough starts to clean the bowl.
- Turn dough out onto a floured surface and knead, gradually adding flour a little at a time, until smooth and does not stick. (Note: You may or may not use all 4 cups of flour.)
- Divide the dough into 2 equal pieces. Place dough in 2 lightly oiled bowls, cover loosely with a layer of plastic wrap and then a kitchen towel and let rise an hour and a half in a warm place, until doubled in size.
To Roll and Assemble the Dough:
- Sprinkle with a couple of tablespoons to a handful of flour on your work surface. Place the dough on the counter and roll the dough out with a rolling pin, starting in the middle and working your way out until it measures roughly 10-12 inches in diameter.
- Brush 1 to 1 ½ teaspoons of melted butter on top.
- Continue to roll out the dough until it is paper thin and uniformly opaque. You can also use your hands to stretch it, if you prefer. As you work, continually check the dough to make sure that it isn’t sticking. The dough is thin enough when you can read through it.
- Spoon your chosen filling evenly over dough until covered.
- Lift the long edge of the dough and gently roll like a jelly roll.
- Once the dough is rolled up into a rope, gently lift it up and place it into a greased loaf pan in the shape of a “U”, and then tuck the remaining dough into the middle to make a third segment. (If you forget to tuck it in, it will look like mine with a big bulb poking out of the top.)
- Repeat with remaining loaf, coiling each rope of dough in its own loaf pan.
- Brush the top of each loaf with a mixture of ¼ cup of cold milk and 1 tablespoon of sugar. (If you prefer, you can also use egg whites in place of this.)
- Cover pans lightly will plastic wrap and allow to rest for approximately 15 minutes.
- Preheat oven to 350°F.
- Remove plastic wrap from dough and place into the preheated oven and bake for 15 minutes. Then, turn down the oven temperature to 300°F and bake for an additional 45 minutes, or until done. Check the bread at 30 minutes to ensure that it is not getting too brown. You may cover the loaves with a sheet of aluminum foil if you need to.
- Remove bread from oven and brush with melted butter.
- Allow to cool on a wire rack for 30 minutes, still in the bread pan. Remove from bread pan and continue to cool for another 90 minutes.
- ENJOY!
Sand Dollar Cookies
I know, I know, I didn’t do a Valentine’s Day post this year. I should be ashamed.
It has been a busy two months, and with the launch of the Sweet Jumbles store, much of my baking time has been (at least temporarily) replaced with making marshmallows.
I also recently had the great opportunity to attend a Food Photography for Bloggers workshop, where I got some great tips on improving the pictures on my blog. At this NYC event, I also met about a dozen other bloggers; it’s great to have a community of people with shared interests who you can share your tricks of the trade with or bounce ideas off of one another.
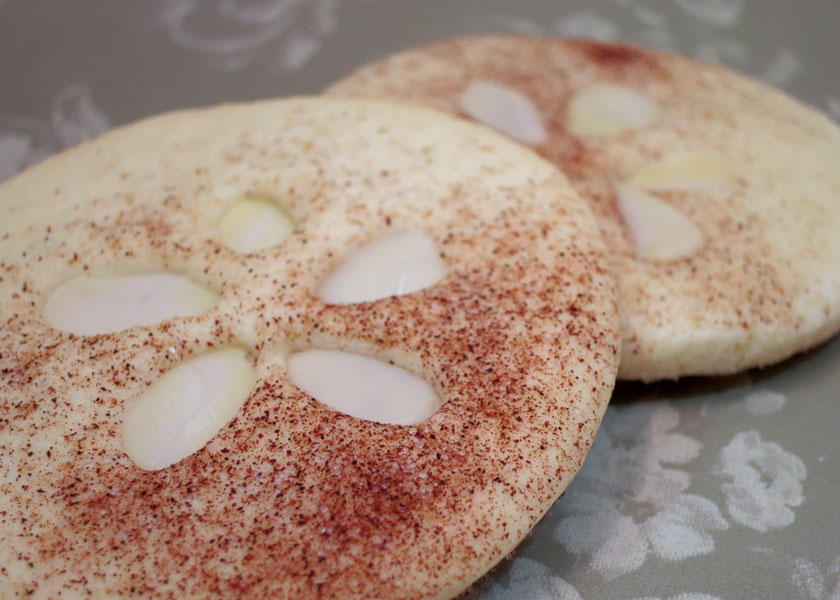
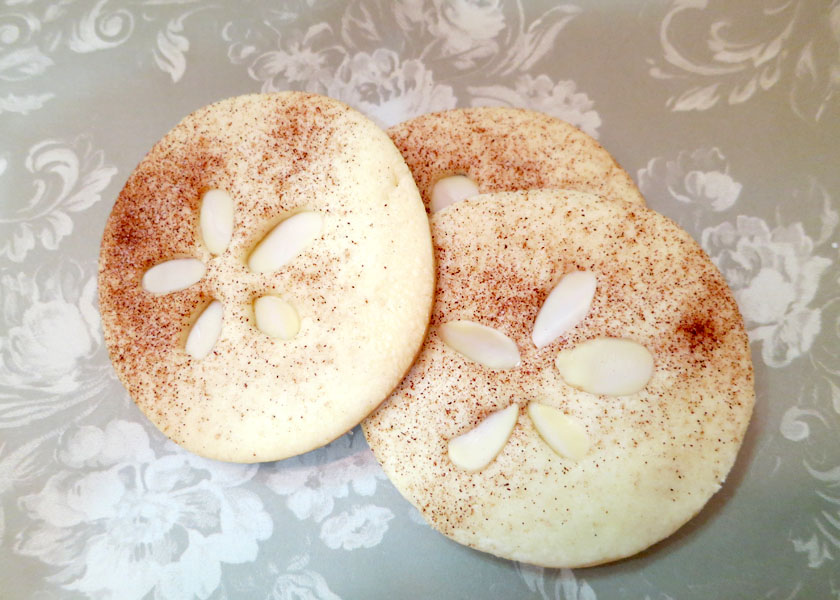
Despite missing the Valentine’s Day blog post opportunity, I made these Sand Dollar cookies just a few days before the holiday and my coworkers did enjoy them last week despite the fact that the cookies weren’t red & pink. 🙂
Sand Dollar Cookies
1 c unsalted butter, softened
2 c powdered sugar
2 eggs + 2 eggs separated
2 t vanilla extract
2 pinches of kosher salt
3 ½ c all-purpose flour
½ t baking powder
cinnamon sugar
sliced almonds
flour
- In a large bowl, cream together the butter and powdered sugar. Mix until creamy.
- Add the 2 whole eggs and 2 yolks only. Beat until well combined.
- Add vanilla and salt. Blend well.
- Add flour and baking powder. Combine until the dough is soft.
- Form a ball with the dough, wrap in plastic wrap and refrigerate for at least two hours or overnight.
- After dough has chilled, preheat the oven to 350° F and line baking sheets with parchment paper or slipat.
- Roll out the dough to ¼″ thick on a floured surface and cut out 2 5/8” circles. (Or any size you want.)
- Brush the circles with the reserved egg whites and lightly sprinkle each circle with cinnamon sugar. Press 5 almond slices into the center of each circle to make a sand dollar.
- Bake at 350° F for 3 minutes. After 3 minutes, remove the baking sheet from the oven and with a spoon press the almonds in again, making slight indentations into the soft dough. This helps them stick. Optionally, you may add more cinnamon at this point if you need to adjust the overall coloring of the final cookie.
- Place the baking sheet back in the oven and bake until the edges are golden brown, another 10 minutes (this time will vary depending on how thick you cut the circles, so just keep an eye on them around the 7 minute mark).
- Remove from oven, let rest on baking sheet for 3 minutes, and then transfer to cooling racks to cool completely.
- Enjoy!
Serves: 30
Calories: 150
Posted in Baking Jumbles
Tagged almonds, cinnamon, cookies, nuts, sand dollar, sugar cookies
Leave a comment
Royal Icing’s many uses
Sweet Jumbles has been very busy on the marshmallow front, coming up with creations for everything from the Superbowl to the Oscars to Valentine’s Day. As a result, time spent baking has been limited. I kid you not, I have had a particular bread recipe hanging on my fridge for 2 weeks now just waiting for me to bake it! Maybe this weekend….
In the meantime, I realized it had been some time since my last post, so I wanted to touch base with all of my dedicated readers.
This post is less of a recipe and more of a secret tip with regard to Royal Icing. If you aren’t familiar with Royal Icing, it’s that really beautiful icing that hardens on cookies. Bakers use it to do very intricate pieces of what can only be described as art. But, even the novice can make some pretty good looking treats. In the past, I’ve included them on this blog when I made baby shower themed cookies and fireworks cookies for the Fourth of July. Other people go more bananas, such as this Honeycomb Sugar Cookie, which by all accounts is beautiful but 6 cookies for $108 seems a little bit WHO THE HECK ARE YOU SELLING TO?! crazy.
So, let’s imagine you decorated some normal (not $108) cookies just for the fun of it and you have leftovers. I’m here to help.
You can go back to the Fireworks blog post for the Royal Icing recipe, but the truth is any royal icing recipe is about the same and it’s easy as 1-2-3. The trick is learning how thick to make the icing and that is all a matter of getting your hands sticky and figuring it out.
Now, as for that leftover icing…. Maybe you always know exactly how much to make and you don’t have leftovers. If so, good for you but I inevitably have leftovers. Sometimes a lot. Until recently, I threw that stuff away…but not anymore!
There are (at least) two really cool things you can do with those leftovers. For both, you need to get out a big ol’ cookie sheet and line it with waxed paper/parchment paper/slipat. Ready?
Now, item #1 is cupcake toppers. You can make fun designs or shapes with your leftover royal icing and down the road plop them on top of your cupcakes for decoration. You can make whatever you want, including seasonal shapes (hearts, for example). Let these sit for 24 hours before touching them. If you want a dual layer – that is, a background and a raised foreground – you need to wait at least a few hours and preferably more before doing the top layer. Store in an airtight container and they will last until the apocalypse. (Maybe not but I’ve had mine for a few months and they’re still good.)

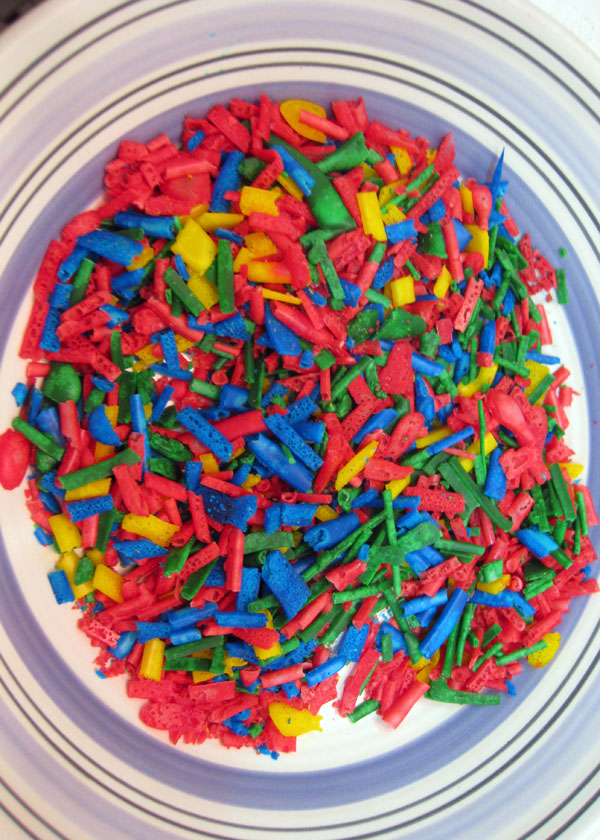
Item #2 is jimmies (or, depending on where you are from in the country, “sprinkles”). You know, the little sugary things you throw on top of an ice cream sundae (or cupcake, or cookie…). To make these, pipe long, thin lines of royal icing on your prepared surface side by side, in relatively straight lines. Wait 24 hours. I’m not kidding. Don’t wait 12, you’ll regret it. Then, chop them into little segments just like the jimmies you are used to buying at the store…or longer, or shorter, whatever you want. Again, store until the apocalypse.
Now your royal icing leftovers aren’t wasted and you have sundae toppings and cupcake toppings to impress your friends! Yum yum!

Posted in Baking Jumbles, Candy Jumbles, Slutty Jumbles
Tagged cupcake toppers, jimmies, marshmallows, royal icing, sprinkles, sweet jumbles
Leave a comment
Craisin Nests
It’s been a week of relative relaxation for Sweet Jumbles.
On the marshmallow front, after a whirlwind month of December fulfilling Christmas and New Year’s Eve orders, January is much quieter. This lull is proving to be a great opportunity to try new recipes and prepare for Valentine’s Day, which will be here before you know it.
Sweet Jumbles did have the honor of being mentioned (and pictured) on The Flair Exchange, a blog featuring really unique and classy party decor. Check them out!
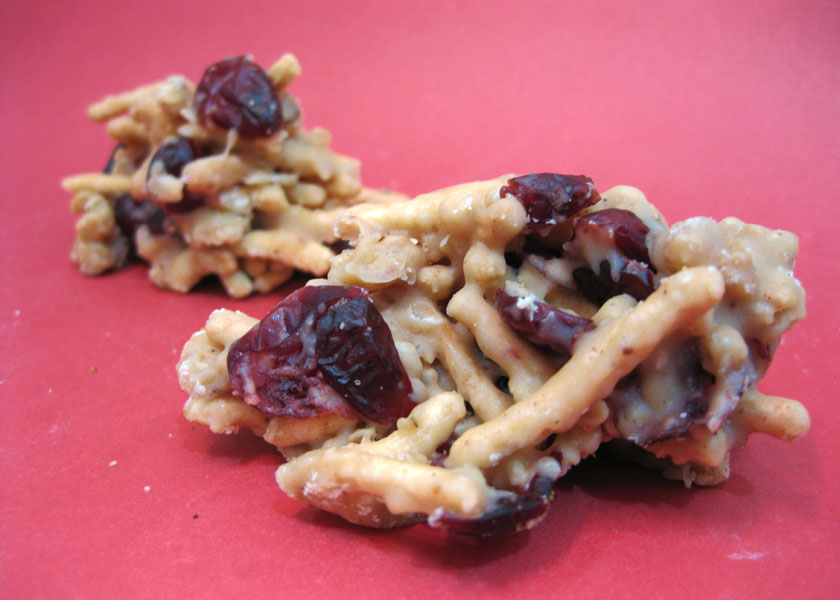
In keeping with the “low maintenance” mood, this week I made Craisin Nests – a super easy and foolproof recipe. (Plus, I love cranberries….) There is also a lot of room for adjustment in this recipe. You can use any flavor of Craisin (I used the original), and for the granola I happened to find Archer Farms Blueberry Granola, which sounded like a good pairing with Craisins. The choices are up to you!
Craisin Nests
Adapted from Ocean Spray
¼ c honey
¼ c heavy cream
12 oz white chocolate baking chips
4 c chow mein noodles
1 c Craisins (any flavor)
1 c granola cereal
½ c slivered almonds (optional)
- Line 2 large baking sheets with waxed paper. Set aside.
- Combine honey and heavy cream in a medium saucepan. Cook over medium-low heat until bubbly. Add chips and continue to cook, stirring regularly until chips are melted.
- Combine remaining ingredients in a large bowl. Pour cream mixture over dry mixture and stir until evenly coated.
- Drop heaping tablespoonfuls onto waxed paper. Let stand until set.
- Store loosely covered.
Serves: 30 cookies
Calories: 128 (varies considerably based on your granola choice)
Posted in Baking Jumbles
Tagged craisins, cranberries, cranberry, granola, nests, white chocolate
2 Comments
